 Mobile Testing
Crashes and ANR’s
Crashes:
A crash occurs when a mobile application unexpectedly terminates and stops functioning due to an unhandled exception or error in the code. When a crash happens, the app is forcibly closed by the operating system to prevent it from causing further issues or affecting the device’s stability. Crashes are typically caused by programming errors, bugs, or unexpected conditions that the app’s code fails to handle properly.
Common Causes of Crashes:
a. Null Pointer Exception: When the app attempts to access an object or variable that is set to null, resulting in a runtime error.
b. Array Index Out of Bounds: Occurs when the app tries to access an element in an array with an invalid index, causing the app to crash.
c. Divide By Zero: If the app performs a division operation with zero as the divisor, it leads to an arithmetic exception and causes a crash.
d. Out of Memory: When the app exhausts its available memory due to memory leaks or excessive memory usage, it may crash.
e. Concurrent Modification: If multiple threads try to modify the same data structure simultaneously without proper synchronization, it can lead to crashes.
How Crashes are Handled:
When an app crashes, the operating system generates a crash report or stack trace, which includes information about the state of the app at the time of the crash. Developers can use crash reporting tools or logging mechanisms to collect crash reports and identify the root cause of the crash. These crash reports help developers identify and fix bugs in their code to prevent future crashes.
ANRs (Application Not Responding):
ANR stands for “Application Not Responding,” and it occurs when the user interface (UI) of the mobile application becomes unresponsive for a significant period. When the main thread of the app is busy performing long-running operations or blocking UI updates, it is unable to respond to user interactions or system events, leading to an ANR.
Common Causes of ANRs:
a. Long-Running Operations: When the app performs time-consuming tasks on the main thread, such as complex computations or data processing, the UI becomes unresponsive.
b. Network Operations on Main Thread: Performing network requests on the main thread can cause ANRs, especially if the network connection is slow or experiences delays.
c. Database Operations on Main Thread: When the app executes database queries or data manipulation on the main thread, it can block UI updates and lead to ANRs.
d. Synchronization Issues: Poorly synchronized code or deadlocks can cause the main thread to become stuck, resulting in ANRs.
How ANRs are Handled:
When an ANR occurs, the Android system detects the unresponsiveness and displays a dialog to the user, indicating that the app is not responding. The dialog gives the user the option to wait for the app to respond or force-close the app. ANRs are typically logged, and developers can use the information to analyze the problematic code sections and optimize long-running operations.
Preventing Crashes and ANRs:
To prevent crashes and ANRs in mobile applications, developers should follow best practices such as:
- Handling exceptions properly by using try-catch blocks to handle potential errors.
- Offloading long-running tasks to background threads to keep the main thread responsive.
- Using asynchronous programming techniques for network requests and database operations.
- Regularly testing the app and monitoring for crashes and ANRs using crash reporting tools.
- Optimizing memory usage and handling resource-intensive operations efficiently.
By addressing and resolving crashes and ANRs, developers can create stable and responsive mobile applications, providing a positive user experience for their users.
Difference Between Crashes and ANR’s:
Crash and ANR (Application Not Responding) are two different types of issues that can occur in mobile applications, and they have distinct characteristics and implications:
- Crash:
- A crash occurs when the mobile application abruptly stops working and exits unexpectedly. It is usually caused by an unhandled exception or error in the app’s code, resulting in the app terminating abruptly.
- When a crash happens, the app may display an error message to the user, and the system may generate a crash report or stack trace, providing information about the cause of the crash.
- Common causes of crashes include null pointer exceptions, array index out of bounds, and other runtime errors.
- ANR (Application Not Responding):
- ANR stands for Application Not Responding, and it occurs when the user interface (UI) of the mobile application becomes unresponsive for a significant period, typically around 5 seconds or more.
- ANRs happen when the main thread of the app is busy performing long-running tasks (e.g., complex computations, network operations) without releasing control to the system’s event loop to process user input or handle UI updates.
- When an ANR occurs, the Android system detects the unresponsiveness and displays a dialog to the user, stating that the app is not responding and giving the option to wait or force-close the app.
In summary, the main difference between a crash and an ANR is that a crash is an unexpected termination of the app due to a fatal error in the code, while an ANR occurs when the app becomes unresponsive for a certain period due to long-running operations on the main thread. Both issues are undesirable for mobile applications, as they can lead to a negative user experience and impact the app’s reputation. Developers should regularly test their apps, handle exceptions properly, and optimize long-running tasks to minimize the occurrence of crashes and ANRs.
Functional and Non Functional Testing in Mobile Application

Functional testing in mobile application testing is the process of evaluating the app’s functionality to ensure that it works as intended and meets the specified requirements. It focuses on verifying whether the app’s features and functionalities perform as expected and deliver the desired outcomes. Functional testing ensures that the app functions correctly across different devices, operating systems, and user scenarios. Here are key aspects and approaches to functional testing in mobile applications:
- Functional Test Scenarios:
- Identify and design test scenarios that cover various aspects of the app’s functionality.
- Test scenarios should represent real-world user interactions and cover positive, negative, and edge cases.
- User Interface (UI) Testing:
- Verify that the app’s user interface elements are correctly displayed and responsive.
- Check the alignment, layout, and visual elements on different devices with varying screen sizes and resolutions.
- Navigation Testing:
- Test the app’s navigation flow to ensure smooth transitions between screens and modules.
- Validate that back, home, and other navigation buttons function as expected.
- User Input and Output Testing:
- Validate user input fields, buttons, and other interactive elements for accurate input and output responses.
- Test form submissions, data entry, and validation of user inputs.
- Functional Integration Testing:
- Test interactions between different app components, such as activities, services, and external APIs.
- Verify that integrated features work seamlessly and exchange data correctly.
- Database and Backend Testing:
- Validate data storage and retrieval in the app’s local database or backend server.
- Test CRUD (Create, Read, Update, Delete) operations for data integrity.
- Feature Testing:
- Test each app feature independently and in combination with other features.
- Ensure that all features work as per their requirements and do not conflict with each other.
- Offline Functionality Testing:
- Test the app’s behavior when there is no internet connection.
- Verify that the app provides appropriate offline support and data synchronization when the connection is restored.
- Device-Specific Testing:
- Perform testing on various devices and screen sizes to ensure compatibility and consistent functionality.
- Test on different operating system versions to verify backward compatibility.
- Localization Testing:
- Validate the app’s functionality with different languages and locales.
- Ensure that localized content and user interfaces are accurate and displayed correctly.
- Accessibility Testing:
- Check the app’s accessibility features for users with disabilities, such as voiceover, large text, and contrast adjustments.
Functional testing is a critical part of mobile application testing as it ensures that the app meets the user’s expectations and performs its intended functions without errors or glitches. By conducting comprehensive functional testing, developers can identify and address issues early in the development process, leading to a higher quality and more user-friendly mobile app.
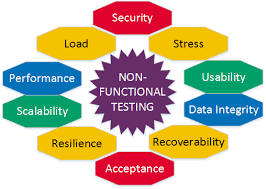
Non-functional testing in mobile application testing focuses on evaluating aspects of the app’s performance, usability, security, and other quality attributes that are not directly related to its functionality. These tests assess how well the app performs under different conditions and how it meets the non-functional requirements and user expectations. Here are key aspects and approaches to non-functional testing in mobile applications:
- Performance Testing:
- Load Testing: Assess the app’s performance under various user loads to ensure it can handle concurrent users without significant slowdowns or crashes.
- Stress Testing: Test the app’s stability and performance under extreme conditions, such as high load or low network connectivity.
- Responsiveness Testing: Measure the app’s response time to user actions, ensuring quick and smooth interactions.
- Usability Testing:
- User Experience (UX) Testing: Evaluate the app’s user interface and interactions to ensure they are intuitive, user-friendly, and visually appealing.
- Navigation Testing: Verify that users can navigate through the app efficiently and without confusion.
- User Feedback Collection: Gather feedback from real users to identify usability issues and areas for improvement.
- Compatibility Testing:
- Device Compatibility: Test the app on different devices with various screen sizes, resolutions, hardware configurations, and operating system versions.
- OS Compatibility: Verify the app’s compatibility with different versions of the target operating systems.
- Security Testing:
- Vulnerability Testing: Identify and address security vulnerabilities, such as data breaches, insecure data storage, and inadequate authentication mechanisms.
- Authorization and Authentication Testing: Verify that the app enforces proper user authentication and authorization controls.
- Network Connectivity Testing:
- Test the app’s behavior under varying network conditions, including Wi-Fi, 3G, 4G, and offline scenarios.
- Validate the app’s handling of network interruptions and data synchronization.
- Battery and Resource Usage Testing:
- Evaluate the app’s impact on the device’s battery life and resource consumption (CPU, memory).
- Optimize the app to minimize battery drain and resource usage.
- Install/Uninstall Testing:
- Verify that the app installs and uninstalls correctly without leaving behind any residual files or data.
- Compliance Testing:
- Check the app’s compliance with relevant industry standards, regulations, and guidelines.
- Localization and Internationalization Testing:
- Ensure that the app functions correctly with different languages, date formats, and regional settings.
- Recovery Testing:
- Test the app’s ability to recover from crashes, network failures, and other unexpected events.
Non-functional testing is crucial for delivering a high-quality mobile app that not only works as intended but also meets user expectations in terms of performance, security, usability, and overall user experience. By conducting comprehensive non-functional testing, developers can identify and address potential issues that may impact the app’s usability and reliability in real-world scenarios.
What is Manifest.xml in Android App?
The manifest file, also known as the “AndroidManifest.xml” file, is an essential configuration file in Android app development. It is a static XML file that provides essential information about the Android app to the Android operating system. Every Android app must include a manifest file in its root directory.
The AndroidManifest.xml file contains critical metadata and instructions that the Android operating system uses to understand and interact with the app. It serves several important purposes:
- App Information: The manifest file contains information about the app, such as its package name, version code, version name, app name, and icon. This information helps the operating system identify and manage the app.
- Components Declaration: The manifest file declares all the components of the app, including activities, services, broadcast receivers, and content providers. Each component is defined with its name, type, and intent filters to indicate which actions it can handle.
- Permissions Declaration: The manifest file lists the permissions required by the app to access specific features or data on the device. These permissions must be explicitly declared, and users are informed about them during app installation.
- App Configuration: The manifest file includes configuration settings for the app, such as supported screen orientations, minimum and target SDK versions, hardware requirements, and more.
- Intent Filters: Intent filters in the manifest file specify the types of intents (messages) that the app can handle. For example, an activity may have an intent filter to handle the “VIEW” action for specific data types, allowing the app to be launched when certain URLs or files are clicked.
- App Components Relationships: The manifest file defines the relationships between different app components, such as which activity is the main entry point of the app.
The AndroidManifest.xml file plays a crucial role in the Android app’s lifecycle and defines the app’s identity, capabilities, and interactions with the Android system and other apps. It acts as a contract between the app and the operating system, allowing the system to manage app installations, permissions, and user interactions effectively. Developers must ensure that the manifest file is correctly configured and contains all the necessary information and declarations required for the app to function correctly on Android devices.
What is Info.plist in IOS App?
Info.plist is a configuration file used in iOS and macOS app development. It is an XML property list file that contains essential metadata and configuration details about the app. The Info.plist file is a crucial part of every iOS and macOS app bundle, and it is automatically created when you create a new project in Xcode.
In iOS development, the Info.plist file contains information about the app’s identity, version, supported devices, required permissions, app icons, and launch screen configuration, among other details. It is used by the iOS operating system to understand and manage the app during installation and runtime.
Key contents of the Info.plist file in iOS app development include:
- Bundle Identifier: A unique string that identifies the app, typically in reverse domain name notation (e.g., com.example.appname).
- App Version and Build Number: Version number and build number of the app for tracking different app releases.
- Supported Device Orientations: Specifies the supported interface orientations (portrait, landscape) for the app.
- Required Device Capabilities: Describes the hardware features and capabilities required by the app (e.g., camera, accelerometer).
- App Icons: The names of the app’s icon files to be used on the home screen and in the App Store.
- Launch Screen Configuration: Specifies the initial screen or storyboard to be shown when the app is launched.
- Supported iOS Versions: The minimum and maximum iOS versions supported by the app.
- Required Permissions: Declares the app’s permissions for accessing sensitive data, hardware, or system resources.
In macOS app development, the Info.plist file serves a similar purpose and includes configuration information specific to macOS apps.
The Info.plist file is an integral part of the app bundle and is automatically generated and updated by Xcode as developers modify the app’s settings and configurations. It ensures that the app is correctly recognized and managed by the operating system and provides essential information for app reviewers and users in the App Store. Developers should be cautious when editing the Info.plist file manually to avoid errors that could affect the app’s functionality and compatibility.