Manual Testing

Acceptance testing

Acceptance testing is formal testing based on user requirements and function processing. It determines whether the software is conforming specified requirements and user requirements or not. It is conducted as a kind of Black Box testing where the number of required users involved testing the acceptance level of the system. It is the fourth and last level of software testing.

Acceptance Testing

User acceptance testing (UAT) is a type of testing, which is done by the customer before accepting the final product. Generally, UAT is done by the customer (domain expert) for their satisfaction, and check whether the application is working according to given business scenarios, real-time scenarios.

In this, we concentrate only on those features and scenarios which are regularly used by the customer or mostly user scenarios for the business or those scenarios which are used daily by the end-user or the customer.

However, the software has passed through three testing levels (Unit Testing, Integration Testing, System Testing) But still there are some minor errors which can be identified when the system is used by the end user in the actual scenario.

Acceptance testing is the squeezing of all the testing processes that have done previously.

Note:

It is done in the separate environment at the customer place, which is known as the UAT environment. The user acceptance testing is done by a different team called as domain expert who is known to the application.

Generally, small companies do not have a domain expert because there is no frequent changes happen in the application.

Reason behind Acceptance Testing

Once the software has undergone through Unit Testing, Integration Testing and System Testing so, Acceptance Testing may seem redundant, but it is required due to the following reasons.

  • During the development of a project if there are changes in requirements and it may not be communicated effectively to the development team.
  • Developers develop functions by examining the requirement document on their own understanding and may not understand the actual requirements of the client.
  • There’s maybe some minor errors which can be identified only when the system is used by the end user in the actual scenario so, to find out these minor errors, acceptance testing is essential.

Note:
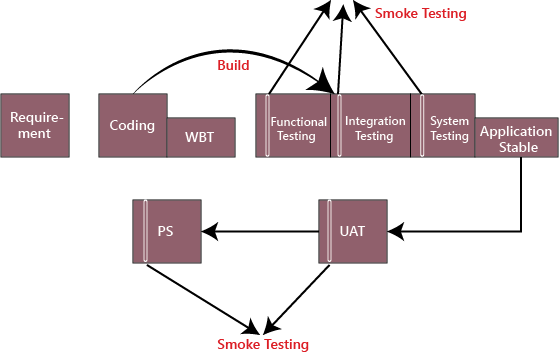
Once we collect the requirement from the customer and done the coding process completely then the test engineer starts all different types of testing until the application becomes stable.

Acceptance Testing

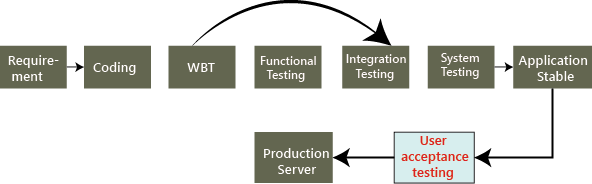
Once the application is bug-free, we handover it to the customer, no customer accept the application blindly before using it. Hence, they do one round of testing for their satisfaction, which is known as user acceptance testing.

Who performs user acceptance testing?

The acceptance testing can be performed by different persons in different cases.

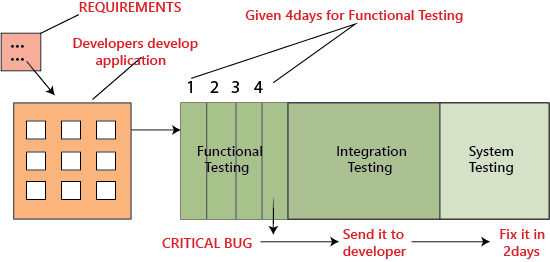
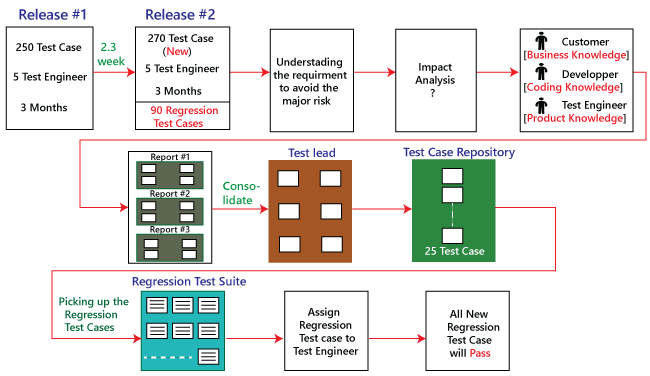
For example, the blue-dart company gives the requirement to TCS for developing the application, and the TCS will accept the needs and agree to deliver the application in the two releases as we can see in the below image:

Acceptance Testing

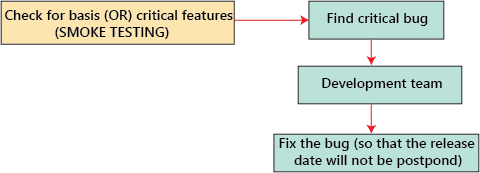
On August 10, the test manager tells the project manager that there is a critical bug in the application, and that will take another four days to fix it.

Acceptance Testing

But the project manager said we have to deliver the software within a given time. It takes another 30 days to fix the defect, or otherwise, we will have to pay the penalty (fine) for each day after the given release date. Is this the real situation? NO, let us see three different cases and understand who perform the acceptance testing.

Case1

In this, we will discuss how the acceptance testing is performed, and here the test engineer will do the acceptance testing.

Acceptance Testing

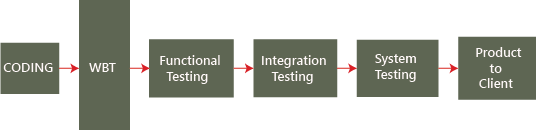
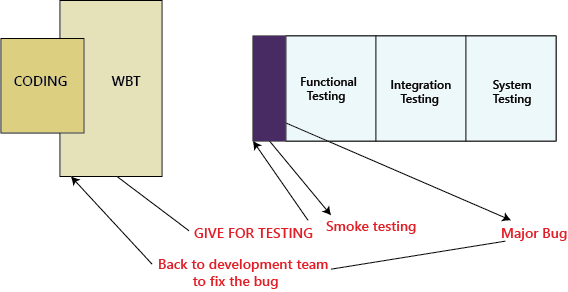
Mostly, the actual flow for testing the application will be seen in the above image, but here it is little difference, as we know where the end-to-end testing or system testing ends and the acceptance testing will proceed. To understand this scenario, follow the below process:

The blue-dart provides the requirements, and TCS develops the application and performs all the testing and handover to the blue-dart company.

Now the question arises the blue-dart will use the application as soon they get it from TCS? NO, the blue dart company has a group of test engineers after they get the software, and this team will start testing the application, and this end-to-end testing is done at the customer environment, which is called the User Acceptance Testing.

Let us see the difference between TCS test engineers and Blue-dart Engineers:

In TCS, the tester will perform the functional testing, integration testing, and system testing and whereas in Blue-dart, the tester will do only the end-to-end or system testing, which is known as acceptance testing.

The difference between end-to-end testing at TCS and blue-dart is as follows:

  • The blue-dart test engineer is the one who gave the requirements
  • The blue-dart engineer understands the product well
  • The blue-dart engineer is a domain expert.
  • They test the real-time data on the application.

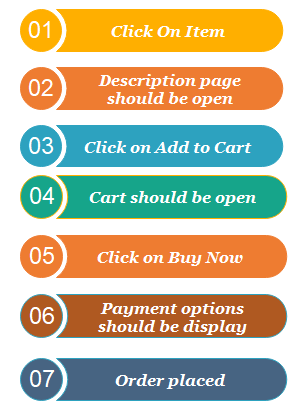
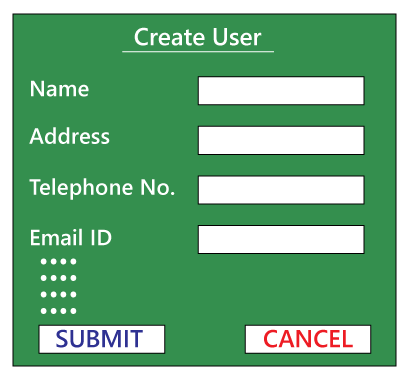
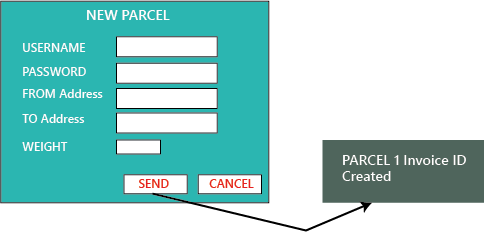
To understand this, we can see the below example, or if we have the application format is like this:

When the application is given to blue-dart test engineers, and they will perform testing and the application should generate a text message “Parcel 1 invoice Id created.” It was not mentioned in the requirement, or it is there, and TCS does not fix it. Then fine(penalty) counts for TCS from that only, and whereas the test engineers at TCS will not knowing this, due to that, we can see the difference between the testing done at TCS and Blue-dart.

Acceptance Testing

Case2

In this case, we will see how the Employee is becoming end-users and performing acceptance testing.

Acceptance Testing

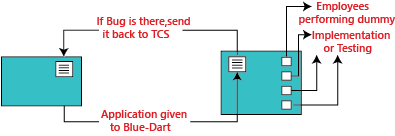
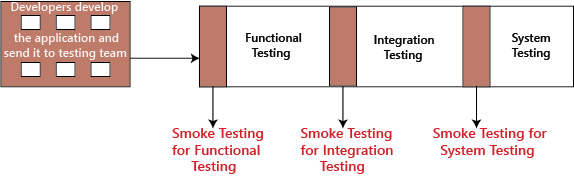
The application is developed and tested at the TCS environment and then sent to blue-dart. And in the Blue-dart, they have fewer test engineers, so they can’t do acceptance testing. So for this, out of 300 employees of blue-dart, they will provide the application to the 30 employees and install the application to their systems and ask them to start using the application and find any defect or issues.

Now 30 employees will do the dummy implementation, which means they provide the data into the application and also written that data manually. And here, the employee becomes the end-user and also identify the bugs and issues while using the application.

These issues are verified against the requirements, and now the fine is charged for TCS (sometimes the penalty is charged on an hourly basis). If the identified bug is not as per requirement, then blue-dart can go for the Request For Enhancement [REF] and Change Request [CR].

Where Request for enhancement means that if the blue-dart feels that a particular module can be improved and developed in a better way, and then they can send the Customer Requirement Specification [CRS] as REF and TCS will follow the CRS and also make sure to do the necessary changes.

And the Change Request means, if the requirement has not been specified accurately, then blue-dart provides the exact needs and Request for changes.

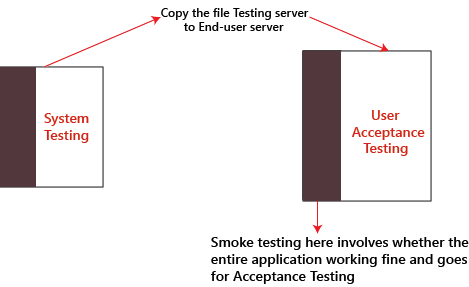
Therefore, the acceptance testing can also be defined as end-to-end testing, which can be done by the engineers who are working in the client environment. Here, they take real-time scenarios and check whether the application is working fine or not, and also we can make real-time business scenarios because the end-user knows how the business flow works.

Note:

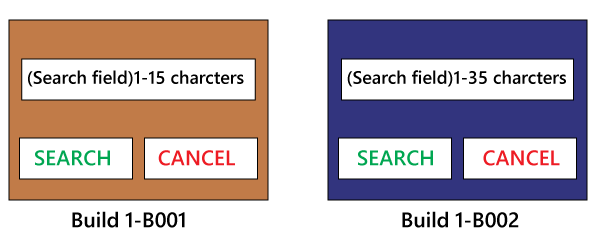
If we are getting more builds for acceptance testing, this means that:

  • After receiving the application, the customer is getting more and more ideas, so they are asking for more and more changes.
  • The quality of the software, which we delivered to customers, is not appropriate, and the development and testing both are not correctly done.
  • The requirement which was given in the starting is not clear.

Case3

In this case, if the blue-dart customers become the end-users.

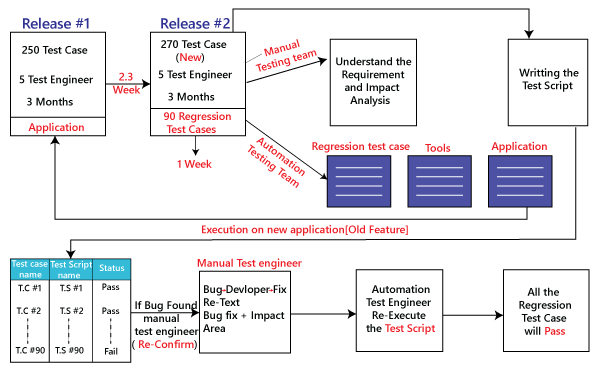
Here, the application is developed and tested and implemented at a blue-dart production server, and n-numbers of users start using the application, which is in the first release. While using the application, the blue-dart comes up with more number of features and enhancements, which is sent with the CRS to the TCS after that TCS will do the further changes in modules and sent it back to the blue-dart.

Hence, what is happing here, the application was developed when the requirement is collected by blue-dart from their end-users and customers.

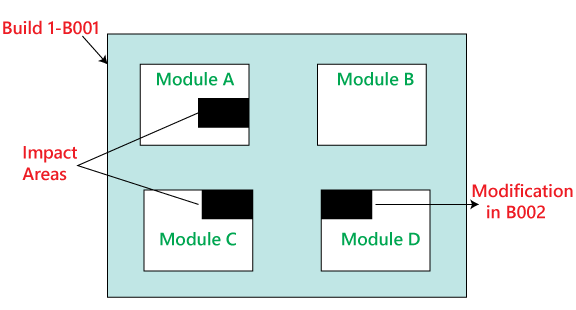
The numbers of releases depend on the following facts:

  • Difficulty of modules
  • The number of modules.
  • How the new module affects the old module.

Note:

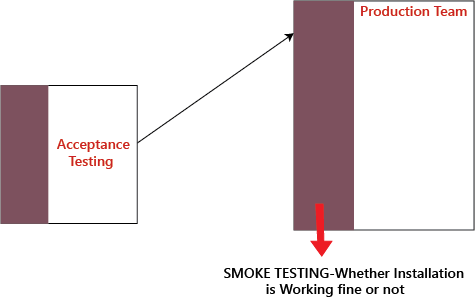
Hotfix: In the production environment, whenever the customer identify the critical bug, we will do the following

  • The developers fix the bugs.
  • Small teams of test engineers will test the software.
  • Re-install the application on the client environment.
  • The client starts using the new software.

This entire process is known as a hotfix, and it can be done in a few hours or one day.

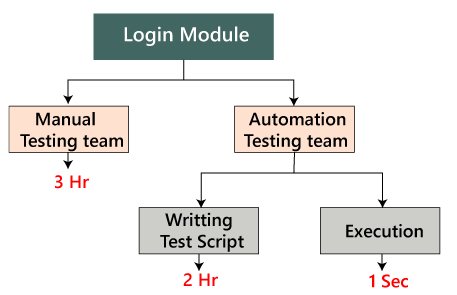
For example: If the significant module, suppose the Login module itself is not working at the production server, then the client will send it immediately for fixing it, and that has to be done as soon as possible.

Short release

Between two major releases, this is a short release of improvements, and it happens when the client needs some small features to change on an urgent basis.

For example, if we have 60 developers, where the ten developers will come out, and out of 40 test engineers, the 3 test engineers will come out, and they develop and test the application. And before adding it to the production server, the customer does one short round of acceptance testing.

Steps to Perform Acceptance Testing

Acceptance Testing

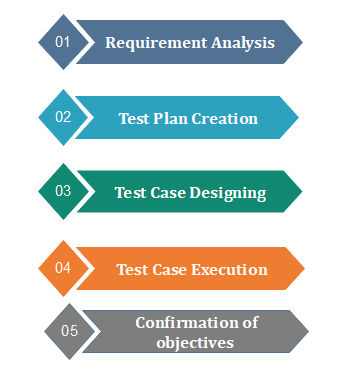
Requirement Analysis:

In this step, the testing team analyzes requirement document to find out the objective of the developed software. Test planning accomplished by using requirement document, Process Flow Diagrams, System Requirements Specification, Business Use Cases, Business Requirements Document and Project Charter.

Test Plan Creation:

Test Plan Creation outlines the whole strategy of the testing process. This strategy is used to ensure and verify whether the software is conforming specified requirements or not.

Test Case Designing:

This step includes the creation of test cases based on test plan documents. Test cases should be designed in a way that can cover most of the acceptance testing scenario.

Test Case Execution:

Test Case Execution includes execution of test cases by using appropriate input values. The testing team collects input values from the end user then all test cases are executed by both tester and end user to make sure software is working correctly in the actual scenario.

Confirmation of objectives:

After successful completion of all testing processes, testing team confirms that the software application is bug-free and it can be delivered to the client.

Tools used in Acceptance Testing

Acceptance Testing can be done by using several tools; some are given below:

done by using several tools; some are given below:

Watir:

Acceptance testing uses this tool for the execution of automated browser-based test cases. It uses Ruby language for the inter-process communication.

Fitness tool:

This tool is used to enter input values and generate test cases automatically. The user needs to input values, these values used by the tool to execute test cases and to produce output. It uses Java language for the inter-process communication. This tool makes it easy to create test cases as well as record them in the form of a table.

Advantages of Acceptance Testing

  • It increases the satisfaction of clients as they test application itself.
  • The quality criteria of the software is defined in an early phase so that the tester has already decided the testing points. It gives a clear view to testing strategy.
  • The information gathered through acceptance testing used by stakeholders to better understand the requirements of the targeted audience.
  • It improves requirement definition as client tests requirement definition according to his needs.

Disadvantages of Acceptance Testing

According to the testing plan, the customer has to write requirements in their own words and by themselves but

  1. Customers are not willing to do that; it defeats the whole point of acceptance testing.
  2. If test cases are written by someone else, the customer does not understand them, so tester has to perform the inspections by themselves only.

If the process is done in this manner, it destroys the existence of the Acceptance Testing.

Manual Testing

Visual testing

Visual testing is used to examine what happened at the point of software failure by defining the data in such a way that the developer can quickly identify the reason of failure, and the information is expressed clearly so that any other developer can utilize this information.

Visual Testing

Visual testing aims to show actual problem rather than just to describe it, remarkably it increases understanding and clarity so that the problem can be solved quickly.

The general meaning of visual is optical means what we can see. Therefore, visual testing requires the video recording of the entire process. It captures everything that happens at the time of system testing in video format. Tester gives a picture in a picture webcam and audio commentary from microphones as an input value.

Visual Inspection System

System for visual inspection consists of a high-quality video camera for collecting data and software and computer to analyze data. The video camera is used to capture a picture of the object during the testing process. These object pictures are sent to a computer via a frame grabber.

The computer has software that analyze the pictures and decide whether the object fails or passes the inspection.

The conditions under which the video testing system works necessarily well controlled and easy to maintain testing persistence.

Visual Testing

Visual testing offers a number of advantages. It increases the quality of communication drastically because testers can optically present the problem to the developer as opposed to describing it in written document form. The developer has all the required evidence of a test failure so, the focus is only on the cause of the failure and how to fix it.

Some remarkable advantages and disadvantages are given below:

Advantages of Visual Testing

  • Visual testing is cheap because information is recorded in video form. So, we don’t need to replicate the information in any other form. It saves money.
  • Visual testing provides portability. A tester can provide video to any other tester if the type of software is same. So, in the case of system failure, we don’t loss the data.
  • Visual testing saves the time of testing as if once the testing process is done and saved in visual form so, we do not need to test software again. Developer can identify the defect by seeing the video.
  • Visual testing requires the minimum number of special skills.
  • Visual testing requires minimum part preparation because there is a need to find only the reason for system failure.

Disadvantages of Visual Testing:

  • Visual testing is suitable only for the surface which can be visible so, need to arrange suitable surface.
  • Visual testing cannot detect hidden defects; it can detect only larger defects.
  • To record clear visible video lighting must be well implemented.
  • It follows only rules does not emulate human inspections.
  • Scratches and cracks can create misinterpretation.
  • Visual testing does not provide component variations on the product if there is variation in software components it cannot be tested via visual testing.
Manual Testing

Exploratory Testing

In this section, we will learn about exploratory testing, its types, when we use it, the advantage and disadvantages of it.

What is exploratory testing?

If requirement does not exist, then we do one round of exploratory testing.

So, for this first, we will be exploring the application in all possible ways, understanding the flow of the application, preparing a test document and then testing the application, this approach is known as exploratory testing.

Exploratory Testing

When we use exploratory testing

We will use this testing for the following aspects:

  • When the requirement is missing
  • Early iteration is required
  • The testing team has the experienced testers when we have a critical application, and new testers entered into the team.

For example, to test any software or the application, first, we will perform unit, integration, and system testing.

So if we want to understand any application first, we will perform unit or component testing, suppose the application is having a login page having many elements, and we will understand each part and doing the component testing, but actually, we are doing the exploratory testing because we are exploring the application.

Suppose we have many modules in the application, and we are trying to do some integration scenarios.

Indirectly we are just doing exploratory testing while performing the integration testing.

And, even if we are performing system testing, indirectly, we are performing exploratory testing because here we are also understanding and exploring the application.

Why the requirement is missing

The requirement is missing because of the following reasons:

If the project is very old, the test engineer can’t understand each scenario from the starting, and it might happen that the requirements will be missing.

For example, in each company, we don’t see any fast process which means, we cannot expect the release to be done in just one month, and the product should be delivered in very less duration of time.

Many companies are still in the development phase for a particular product from the last 6 to 12 years.

Suppose one company has a 15-year-old project, and they hired a new test engineer now. The new test engineer faces many difficulties in understanding every scenario or requirement from scratch or starting because he/she is new with the application.

In that case, what test engineer will do with software that is 15 years old?

So firstly, he/she will take the application and start exploring the application. Once the test engineer starts using the application, he/she will get to know how the application is working. And, this process is nothing but exploratory testing.

How to perform exploratory testing

To perform exploratory testing, first, we will start using the application and understand the requirement of the application from the person who has a good product knowledge such as senior test engineer, and developers.

Then we will explore the application and write the necessary document, and this document is sent to the domain expert, and they will go through the document.

And we can test the application based on our knowledge, and taking the help of the competitive product, which is already launched in the market.

Types of exploratory testing

Exploratory testing can be divided into three parts, which are as follows:

  • Freestyle
  • Strategy based
  • Scenario-based
Exploratory Testing

Freestyle

In freestyle testing, we did not follow any rules, there is no maximum coverage, and we will explore the application just like Adhoc testing.

If we want to get friendly with the software and checks the other test engineer’s works, we can use freestyle exploratory testing.

Strategy based

Strategy based exploratory testing can be performed with the help of multiple testing techniques such as risk-based, boundary value analysis, and equivalence partitioning.

It is done by the experienced tester and who is using the application for the longest time because he/she is known the application very much.

Scenario-based

Scenario-based exploratory testing is performed with the help of multiple scenarios such as end-to-end, test scenarios, and real user scenarios.

The test engineer can find defects and also checks various set of possibilities for the multiple scenarios with their application knowledge while they were exploring the application.

Advantages and Disadvantages of Exploratory Testing

Advantages

Following are some benefits of exploratory testing:

  • If the test engineer using the exploratory testing, he/she may get a critical bug early because, in this testing, we need less preparation.
  • In this testing, we can also find those bugs which may have been missed in the test cases.
  • This testing can be used to test the new features, whereas, for the existing functionality, we will use the regression testing if we have less time to test the application.
  • For the test engineer, this testing requires a lot of concentration to explore the application.

Disadvantages

Following are the disadvantages of exploratory testing:

  • Time Consuming
    It is a time taking process because we don’t know the requirement, and which feature has to be tested first because we are just exploring the application.
  • The test engineer will misunderstand the feature as a bug.
    For example, suppose we have one login page and requirement says we have to provide the necessary details like username, password, and employee id then click on the login button.
    But while performing exploratory testing, we only provide the details of username, password, and then click on the login button, but we have not entered the employee id. Since we don’t have the requirement, and doing exploratory testing, that’s why we feel that the employee id component is a bug, but it is a feature.
  • Bugs can be misunderstood as a feature
    For example, suppose we have one registration page where we have to provide details like the username, password, mobile number, and the email id.
    And the requirement says that when we are providing the mobile number and email id, the same code will be sent to the registered email id and mobile number to verify whether it is correct or not.
    But when we are performing exploratory testing on the registration page and provide all the details (user name, password, mobile number, and email id), the code will only be sent to our mobile number, not to the email id.
    It is happening because the requirement is missing, and we will be misunderstood that this bug is a feature, and we never come to that this is a bug.
Manual Testing

Stress Testing

In this section, we are going to understand Stress Testing, which is an important part of Performance testing and used to checks the behavior of an application by applying a load greater than the desired load.

And we also learn about its process, why we need to perform the Stress testing, the objective of Stress testing, examples, various features of stress Testing, advantage and disadvantage.

Introduction of Stress Testing

In software testing, stress testing is an important part of performance testing under non-functional testing.

Stress Testing is testing used to check the accessibility and robustness of software beyond usual functional limits. It mainly considers for critical software but it can also be used for all types of software applications.

It is also known as Endurance Testing, fatigue testing or Torture Testing.

The stress testing includes the testing beyond standard operational size, repeatedly to a breaking point, to get the outputs.

It highlights the error handling and robustness under a heavy load instead of correct behavior under regular conditions.

In other words, we can say that Stress testing is used to verify the constancy and

dependability of the system and also make sure that the system would not crash under disaster circumstances.

To analyses how the system works under extreme conditions, we perform stress testing outside the normal load.

The Objective of Stress Testing

The main objective of using stress testing is to fulfill the following aspects:

  • The primary purpose of executing the stress testing is to confirm that the software does not crash in lacking computational resources like disk space, memory, and network request.
  • The implementation of stress testing certifies that the system fails and improves effortlessly, known as the recoverability process.
  • We can use stress testing to discover hardware issues, data corruption issues.
  • Stress testing will help us to identify the security weaknesses that might sneak-in throughout constant peak load.
  • It helps determine the software application’s data integrity throughout the extreme load, which implies that the data should be in a dependable state after a failure.

Features of Stress Testing

Following are the basic features of stress testing:

  • Stress testing also makes sure that unpredicted failures do not cause security issues.
  • It is used to analyze the system works under rare circumstances and the system’s behavior after a failure.
  • Stress testing is used to check the system has saved the data before crashing or not.
  • Stress testing guarantees to display a suitable error message when the system is under stress.

Why do we need to perform the Stress Testing?

We need to perform stress testing if we encounter the following situations:

Whenever e-commerce or online shopping sites announce a sale during the festival may witness a spike in traffic. Or when an article is mention in a top newspaper, its knowledges an unexpected flow in traffic.

If we fail to assist this sudden traffic can result in loss of profits and status. So, in that case, we need to execute the Stress Testing to integrate such irregular traffic spikes.

Stress testing is also needed to be performed for the below scenarios:

  • When the system is under stress, it should display a proper error message.
  • To inspect whether the system works under bizarre circumstances.
  • If the system is failed under risky situations could result in huge profits loss.
  • By implementing Stress Testing, we will be prepared for extreme conditions.

Example of Stress Testing

Let’s see some real-time examples where we can discover the usage of Stress Testing.

Example 1: E-commerce website/ application

Throughout the new product releases, sales, holidays, promotions, and festival offers, the e-commerce application tends to get many users in a very short time.

Example 2: News website at the time of some major/viral event

The news website will crash or slow down when a major event happens; for example, when Michael Jackson passed away, a maximum number of news websites are slow down, or some of them also crashed.

To overcome this situation, we need to perform stress testing on the particular application and be prepared to recover quickly in case of any crashes or failure.

Example 3: Education Board’s result website

Stress testing is important to perform on the education board’s result website. On the day of some results, many students, users, and applicants will logins to the particular to check their grades.

Therefore, the execution of stress testing helps identify the failure of the application and evaluate the performance and recoverability when the ultimate load occurs in a short duration or when the result is out.

Note: Stress testing of the website or an application is very significant to handle such an unexpected increase in several visitors or users.

Types of Stress Testing

Stress testing can be categories into various parts, which are as follows:

Stress Testing
  • Product or Application stress testing
  • Server-client or distribute Stress Testing
  • Analytical Stress Testing
  • Systematic Stress Testing
  • Transactional Stress Testing

Product or Application Stress Testing

  • The application or product stress testing is mainly focused on determining the faults related to network issues, data locking, blocking, and a performance bottleneck in a software product.

Server-client or Distribute Stress Testing

  • In this type of stress testing, all the clients related to the server are tested.
  • The distribute stress testing is used to perform across all clients from the server.
  • The server can communicate with clients A and B, but it cannot link with clients C and D when there is stress on the client-server system as we can see in the below image:
Stress Testing

Analytical/ Exploratory Stress Testing

  • Analytical or exploratory testing is used to execute the system with unusual constraints unlikely to occur in a real scenario.
  • It is mainly used to identify the bugs in rare situations such as a large number of users logged simultaneously or a database went offline when retrieved from a website.

Let see some examples of analytical Stress Testing where such irregular conditions are used:

  • When a large number of parallel users try to log into the application.
  • Data is added in enormously large quantity in the database.
  • When the website tries to reach it from the front end, and database linked to the website shuts down.

Systematic Stress Testing

  • It is combined testing used to execute the test across various systems running on a similar server.
  • Using systematic stress testing, we can easily detect the bottleneck where data of one application blocks another application.

Transactional Stress Testing

  • Another type of stress testing is transactional stress testing, which is used to implemented one or more transactions between various applications.
  • The main objective of performing the transactional stress testing is to enhance the system performance.

Process of Stress testing / how to perform stress testing

The stress testing process will be completed into the following steps:

Stress Testing

Step1: Detect the testing environment

In the first step of stress testing, we will identify the network, software, and hardware configurations and tools available to achieve the stress test.

Step2: Find performance acceptance criteria

After identifying the testing environment, we will find the performance acceptance criteria, which help us categorize the metrics used to test the application’s performance under stress.

And also, identifying the success criteria for a stress test, for example, the maximum load can apply to the application for it to fail.

Step3: Plan and design stress tests

In the next step of the stress testing process, we will plan and design a stress test plan, identify test scenarios etc.

Step4: Configure the test environment

Once the stress test plan has been created successfully, we will move to our next step where we create the test environment, tools and resources essential to perform each approach as features and components become available for test.

Step5: Implement test design

After the test environment’s configuration, we will develop the stress tests resulting the test design best performs.

Step6: Execute tests

In the next step, we will execute the particular test, observe and confirm the tests along with test data and output collection.

Step7: Analyze the results

In the last step of the stress testing process, we will analyze the outcomes, combine and share the respective teams’ output data.

Stress testing tools

As we know that stress testing is part of performance testing, the tools used for performance testing can be used for stress testing.Therefore, we have various types of Stress testing tools available in the market, where some are commercial tools and open-source tools. Some of the most commonly Stress testing are listed below:

  • Apache JMeter
  • NeoLoad
  • Stress tester
  • LoadRunner

Advantages and disadvantages of Stress Testing

Advantages

Some of the vital benefits of performing Stress testing is as follows:

  • Stress testing signifies the system’s behavior after failure and makes sure that the system recovers quickly from the crashes.
  • The most important advantage of executing the stress testing will make the system work in regular and irregular conditions in a suitable way.
  • It determines the scalability and enhance the performance of the software.

Disadvantages

Some of the most common drawbacks of Stress testing are as follows:

  • Even in open-source tools like JMeter, a load testing environment is required, which should be as close to the production environment setup as possible.
  • If we are writing the Stress test script, the person should have enough scripting knowledge of the language supported by the particular tool.
  • If we are using stress testing, it will require additional resources, which makes this testing bit costlier.
  • If we perform the Stress Testing manually, it became a tedious and complicated task to complete, and it may also not produce the expected results.

Overview

In this tutorial, we have understood that stress testing is used to assess the system under extreme situations. It can verify the system to recover back to normal status.

It is a type of non-functional testing and generally executed after the functional testing.

Stress testing entirely concentrate on testing the system under extreme load situations to detect its breaking point and see if suitable messages are shown when the system is not responsive.

Manual Testing

Load Testing

In this section, we are going to understand load testing, which is the important part of Performance testing and used to check the performance of the software by applying some load.

And we also learn about its process, why we need to perform the load testing, the objective of load testing, example, various strategies of load Testing, advantage and disadvantage.

Introduction of Load Testing

In software testing, load testing is an integral part of performance testing under non-functional testing.

Load testing is testing where we check an application’s performance by applying some load, which is either less than or equal to the desired load.

Here, load means that when N-number of users using the application simultaneously or sending the request to the server at a time.

Load testing will help to detect the maximum operating capacity of an application and any blockages or bottlenecks.

It governs how the software application performs while being accessed by several users at the same time.

The load testing is mainly used to test the Client/Server’s performance and applications that are web-based.

In other words, we can say the load testing is used to find whether the organization used for compering the application is necessary or not, and the performance of the application is maintained when it is at the maximum of its user load.

Generally, load testing is used to signify how many concurrent users handle the application and the application’s scale in terms of hardware, network capacity etc.

The Objective of Load Testing

The main objective of using the load testing is to fulfill the following aspects:

  • The load testing is used to perform the maximum quantity of software applications without important performance breakdown.
  • It is used to govern the scalability of the application and allows various users to access it.
  • It is used to identify the total count of users that can access the application simultaneously.
  • The load testing is used to determine whether the latest infrastructure can run the software application or not and determine the sustainability of the application concerning extreme user load.

Why is load testing important?

The load testing is essential because of the following factor:

  • It guarantees the system and its consistency and performance.
  • The load testing is necessary if any code changes occur in the application that may affect the application’s performance.
  • It is important because it reproduces the real user scenarios.
  • It helps find the system’s bottlenecks.

Rules for load testing

During the execution of the load testing, a test engineer should follow the below rules:

  • A test engineer tries to evade downloading images on the site.
  • Once the application becomes functionally stable, load testing should be planned.
  • The reliability of response time concludes the past period should be logged and the same should be compared with several test runs.
  • For each scenario or script number of users should be decided.

Load Testing Process

The Load testing process will be completed in the following steps:

Load Testing

Step1: Test environment setup

  • In the first step, we will set up the test environment to execute the load testing to ensure the testing can be done appropriately.
  • And the test environment should be set up near to the production environment as likely in terms of network, hardware, software specifications etc.

Step2: Load the test scenario or specify the performance criteria

  • In the next step, we will define the performance criteria, which contain the response time, reasonable limits on throughput, and the load test transaction.
  • And then, we create the load test scenarios, which ensure the success criteria are finalized.
  • In the load testing, transactions are decided for an application
    and data is set for each transaction.

Note: A test scenario is a combination of scripts, and virtual users executed during a testing session. The Scenarios could be of two types, either manual or goal oriented.

For example, In the LoadRunner testing tool, the scenarios are created with the LoadRunner controller’s help.

Step3: Execution of test scenarios

  • Once we successfully create the load test scenarios, we will execute the particular test scenarios.
  • But before we execute the load test scenarios, we have to set the different configurations and matrices to collect the information.
  • The load on the server is matched by consecutively several virtual users to complete the tasks concurrently.
  • And we can execute the entire scenario in virtual user groups or individual virtual users.

Step4: Analysis of the test result

  • After executing the load test scenarios, we will analyze the test results.
  • The load test Scenario can be inspected with the help of LoadRunner online monitors like:
    • System resource
    • Run-time transaction
    • Network delay
    • Web resource

Step5: Re-test

  • The last step of the load testing process depends on the test result because if the test fails, we have to perform the same process repeatedly until the test result is passed and all the issues and bottlenecks are fixed.

Examples of Load Testing

Let see some real-time example where we can see the massive failure of the particular application as they did not perform the load testing:

Example1

E-commerce websites capitalize deeply in advertising campaigns but not in Load Testing to guarantee ideal system performance, and they get massive users at the same time. Because of that, some very popular sites have suffered a serious failure

Example2

Amazon lost $66,000-$66,240 per minute because the amazon.com server crashed heavily by users’ traffic for 30 minutes in 2013.

And during a festival offer, an Airline website cannot handle 10000+ users at the same time.

Example3

More people have a habit of booking a flight ticket throughout holidays or on the days when an air company has an offer.

As we can see, more people incline to buy products during a promotional event like Diwali, Black Friday, big billion days sales.

And if a website or an application crashes in such an event, users may leave the website and go to a competitor’s application, leading to loss of revenue and market share. Those scenarios may occur because we do not perform the load testing on the system.

Note: Based on a survey if a site is crashed or slow, 70-75% of the users would leave the website. If the website or an application did not load in 3 seconds, 40-50% of the users said they would buy elsewhere.

Difference between Load and Stress testing

The major difference between load and stress testing is listed in the following table:

Load Testing
Load TestingStress Testing
Using load testing, the test engineer can detect the bottleneck and tell the cause of bottlenecks before deployment to the production server.By using Stress testing, the test engineer can check the system capacity when the number of users suddenly increases before the system failure or crashes.

Types of Load Testing tools

We have the various type of load testing tools to execute the load testing, which is as follows:

Load Testing

Load Testing Tools [Open-Source]

  • To perform the load testing, we can use the open-source load testing tools as we have various load testing tools available in the market for free of cost.
  • If we have a limited budget for the particular project, we can use open-source tools. But not every time, as they may not be as advanced as the paid load testing tool.
  • JMeter is the most frequently used open-source load testing tool.

Manual Load Testing

  • One of the most effective load testing approaches is the manual process to perform the load testing. Still, we cannot rely on it as it does not produce repeatable outputs and assessable stress levels on an application.
  • And if we perform the load testing manually, it requires a lot of workforces, which is quite expensive compared to paid tools.

Load Testing Tools [Enterprise-class]

  • The paid load testing tools are used to support many protocols; therefore, it can implement various types of applications like Streaming Media, ERP/CRM, etc.
  • LoadRunner is the most popular licensed load testing tool.

In house Developed Load Testing Tools

  • The particular organization uses the in-house developed load testing tools approaches to build their tools to perform the load tests on their application for understanding the importance of load testing

Load testing tools

We have various types of load testing tools available in the market, where some are commercial tools and open-source tools. Let see some of the most common load testing are as follows:

  • LoadNinja
  • Apache JMeter
  • NeoLoad
  • HP Performance Tester
  • WebLoad
  • LoadView

Advantages and disadvantages of load testing

Advantages

Some of the vital benefits of performing the load testing are as follows:

  • Load testing helps us to detect the bottlenecks and performance-related issues before production.
  • The load testing enhances the scalability regarding network, software and database for the system or software application.
  • The major advantage of performing the load testing is reducing the cost failures, which also helps us minimize the system interruption risks.
  • Customer’s satisfaction is enhanced while using the load testing.

Disadvantages

Following are the drawbacks of load testing:

  • Load testing can only be executed if we have enough knowledge of any programming language as well as testing tools.
  • Usage of load testing tools can be an expensive process because pricing depends on the number of virtual users supported.

Overview

In the load testing tutorial, we have understood the following aspects of load testing:

  • While executing an application’s performance testing, the load plays a vital role and helps to learn the software’s effectiveness and ability or an application.
  • If we ignored the load testing, it might cause financial losses.
  • It is specifying as a type of software testingwhich controls a system’s performance under real-life load conditions.
  • It expands the scalability, performance issues, and constancy of the application before production is available.
  • Using the various load testing tools, we can ensure to deliver a quality product that cannot crash while maximum numbers of users using it simultaneously.
Manual Testing

Dynamic Testing

In this section, we are going to understand Dynamic testing, which is done when the code is executed in the run time environment.

And we also learn about Dynamic testing, why we use it, how to perform it, what are a different technique for Dynamic testing, various tools for Dynamic Testing.

Introduction to Dynamic Testing

Dynamic testing is one of the most important parts of Software testing, which is used to analyse the code’s dynamic behavior.

The dynamic testing is working with the software by giving input values and verifying if the output is expected by implementing a specific test case that can be done manually or with an automation process.

The dynamic testing can be done when the code is executed in the run time environment. It is a validation process where functional testing [unit, integration, system, and user acceptance testing] and non-functional testing [Performance, usability, compatibility, recovery and security testing] are performed.

As we know that Static testing is a verification process, whereas dynamic testing is a validation process, and together they help us to deliver a cost-effective quality Software product.

Why do we need to perform Dynamic Testing?

We can easily understand how to implement dynamic testing during the STLC [Software Testing Life Cycle] if we consider the characteristics accessible by dynamic testing.

Using dynamic testing, the team can verify the software’s critical features, but some of those can be left without any assessment. And they can also affect the functioning, reliability, and performance of the software product.

Hence, we can perform Dynamic testing to fulfill the various below aspects:

  • We will perform dynamic testing to check whether the application or software is working fine during and after installing the application without any error.
  • We can perform dynamic testing to verify the efficient behavior of the software.
  • The software should be compiled and run if we want to perform dynamic testing.
  • Generally, Dynamic Testing is implemented to define the dynamic behavior of code.
  • The team implements the code to test the software application’s performance in a run-time environment during the dynamic testing process.
  • It makes sure that the concurrency of the software application with the customer’s potentials, needs and the end-user.
  • It is an operative technique to measure the effect of several environmental stresses on the software application like network, hardware

Characteristic of Dynamic Testing

For understanding the fundamental of the software testing techniques, we have to learn their attribute and several other components. Hence, following are some of the important characteristics of dynamic testing:

  • It is implemented throughout the validation stage of software testing.
  • Dynamic Testing is done by performing the program.
  • Both functional and non-functional testing include in dynamic testing.
  • In Dynamic testing, we can easily identify the bugs for the particular software.
  • It helps the team in validating the reliability of the software application.
  • Unlike static testing, the team implements the software’s code to get expected outputs in dynamic testing.
  • Dynamic testing is performed directly on the software application as compare to other testing techniques.
  • Dynamic testing is a more formal testing approach for different testing activities such as test execution, coverage consideration, reporting and test case identification.

Dynamic testing Process

Generally, dynamic testing follows a set process when the approach and test implementation performances are decided, and the team can move to execute the different testing activities.

With the help of this process, the team can find any irregularity from the approaches and strategies and help us display all the testing steps.

In the STLC, the process of Dynamic Testing involves different functions. And all the functions in the dynamic testing process rely on the conclusion of the earlier task in the testing process.

The Dynamic testing process will complete in the following steps:

  • Test case design
  • Test environment step-up
  • Test case execution
  • Test analysis and evaluation
  • Bug Reporting

The actual Dynamic Testing Process begins from Test Case Design in the software testing life cycle. Now, we discuss each step one by one to get complete knowledge of the dynamic testing process.

Dynamic Testing

Step1: Test Case Design

In the first step of the dynamic testing process, the teams will design the test cases. Here, we are creating those test cases that depend on the requirements and scope of testing established before the start of the project.

In this step, we can originate the test conditions, obtain the test cases, extract the coverage Items, and identify those features that need to be tested.

Step2: Environment Setup

In the test environment phase, we will make sure that the testing environment should always be parallel to the production environment because the testing is implemented directly on the software product.

In this step, the dynamic testing process’s main objective is to install the test environment, which helps us succeed in the test machines.

Step3: Test Execution

Once we successfully install the test environment, we will execute those test cases prepared in the primary stage of the dynamic testing process.

Step4: Analysis & Evaluation

After executing the test cases, we will analyse and evaluate the outcomes derived from the testing. And we will compare those outcomes with the expected results.

If expected and actual results are not the same according to executing, we will consider those test cases as fail, and log the Bug in the bug repository.

Step5: Bug Reporting

After analyzing the test cases, we will be reported and recorded any bugs or defects between the actual result and expected result to the concerned person. And the concerned person will make sure that the issue has been solved and delivering a quality product.

Example of Dynamic Testing

Let us take one sample example where we understand how dynamic testing will woks.

So, for this, we will understand the login module of any application, such as www. Twitter.com.

Suppose we want to create one new account with a secure password, so we need to follow some pre-defined rules in the password field.

And the password should have eight characters long, capital letters and at least one special character.

If we are testing this functionality, we would take all the input conditions to test this and then verify the output.

We can also put the non-working constraints, such as input a 4-character password, and validate if there is an error occurred or not.

Types of Dynamic testing

Dynamic testing divided into two different testing approach, which are as follows:

  • White-box testing
  • Black-box testing

Both the testing techniques will help us execute the dynamic testing process efficiently as they play an important role in verify the performance and quality of the software.

Let’s understand them one by one in detail and also see the below diagram of it:

Dynamic Testing

White-box testing

The word white box is used to describe the core perspective of the system. The developers will perform the white box testing, where they will test every line of the program’s code.

When the developers perform the White-box testing and then send the software application to the testing team, the testing team will do the black box testing, validate the application as well as the requirements. The white-box testing is further divided into data flow/control testing.

Data flow Testing

The data flow testing is used to identify the program’s test paths as per the settings of descriptions and uses of variables in the program. And it does not relate to data flow diagrams.

Black-box testing

The black-box testing is a testing technique where the test engineer selects a module and gives an input value to observe its functionality and analysis of whether the function is giving the expected output or not. If the function produced the correct output, then the particular function will be marked as pass.

To perform black-box testing, the test engineer should have specific knowledge about the software’s requirement rather than programming knowledge of the software.

And then, they can develop the test cases to check the correctness of the software’s functionality.

Black-box testing is further classified into two types, which are as follows:

  • Functional testing
  • Non-function testing

Functional testing

Functional testing is one of the most important parts of black-box testing. It mainly focuses on application specification rather than the actual code, and the test engineer will test the program rather than the system.

The functional testing is used to validate the software application’s functionality, whether the function is working as per the requirement specification.

In functional testing, each module has been tested by giving the value, determining the output, and verifying the actual output with the expected value.

The functional testing is classified into four different type of testing, which are as follows:

  • Unit testing
  • Integration testing
  • System testing
  • User acceptance testing

Unit testing

  • The unit testing is the first level of functional testing to perform any testing on the software application.
  • We will perform the unit testing whenever the application is ready and given to the Test engineer. He/she will start checking every component of the module or application independently or one by one. And this process is known as components testing.
  • The primary objective to perform unit testing is to test the correctness of remote code and validate the unit components with their performance.

Integration testing

  • When we have successfully done the unit testing on the specific software, we will go for the integration testing. The integration testing will help us to combined individual units and tested as a group. And it is the second levelof functional testing.
  • When all the components or modules are working independently, we will check the data flow between the dependent modules, which is known as integration testing.
  • The developers and the test engineer perform the integration testing. And the main purpose of the integration is to identify the faults in the interaction between the integrated units.

System testing

  • System testing is used to check the end-to-end flow of an application or the software as a user.
  • System testing is also known as end-to-end testing as the testing environment is similar to the production environment.
  • In the third level (system testing) of functional testing, we go through all the necessary modules of an application and check if the end features or the end business works fine, and test the product as a whole system.

User acceptance testing

  • The user acceptance testing is performed to certify the system according to requirements. The customer or client does it before accepting the final product.
  • In other words, we can say that the UAT is done by the customer (domain expert) for their satisfaction and check whether the application is working according to given business scenarios and real-time scenarios.
  • It is the last level of functional testing, which is execute before releasing the software to the market or production environment where two or more end-users will involve.

Non- Functional testing

Another part of black-box testing is non-functional testing. It is used to test non-functional constraints like load test, reliability, performance, and software accountability.

The main objective of performing the non-functional testing is to test the software system’s reading speed according to the non-functional parameters because these parameters are never tested before the functional testing.

Non-functional testing plays a vital role in customer satisfaction while testing the software or the application.

It reduces the risk of production and related costs of the software, and it provides a thorough knowledge of product behavior and used technologies.

Furthermore, the non-functional testing is divided into various parts, which can be performed at the test level.

  • Performance testing
  • Usability testing
  • Compatibility testing
  • Recovery testing
  • Security testing

Let’s understand them in details one by one:

Performance Testing

  • The performance testing is the most importantly used type of non-functional
  • Once the software is stable and moved to the production, and it may be accessed by multiple users concurrently, we will do performance testing.
  • The performance testing is testing where we check the behavior of an application by applying some load.
  • As we know it is non-functional testing, which doesn’t mean that we always use performance testing when the application is functionally stable; only then we go for performance testing.

Usability Testing

  • In usability testing, we will check the user-friendliness, efficiency, and accuracy of the software application.
  • If we are using usability testing, it ensures that the developed software is easy to test while using the system without facing any problem and makes end-user life easier.

Compatibility testing

  • The next type of non-functional testing is compatibility testing, which is used to check the functionality of an application on different software, hardware platforms, network, and browsers.
  • The compatibility testing is not performed for all the applications; we will use the compatibility testing only for those applications where we don’t have control over the platform used by users.

Recovery testing

  • In recovery testing, we can verify how well a system can recover from hardware failures and crashes.
  • It reproduced the failure modes or essential producing failures in a controlled environment.
  • The recovery testing is performed to confirm that a system is fault-tolerant and can improve well from failures.

Security testing

  • The security testing is used to discover the weaknesses, risks, or threats in the software application and help us stop the nasty attack from outsiders and ensure our software applications’ security.
  • The main purpose of security testing is to identify all the possible uncertainties and vulnerabilities of the application so that the software does not stop working.

Advantages and disadvantages of Dynamic Testing

From detecting and evaluating several bugs and errors in the software to verifying the software’s performance, dynamic testing provides serval benefits to the users and the testing team.

However, we have various advantages of dynamic testing as well as some disadvantages.

Therefore, below we listed some of the advantages and disadvantages of dynamic testing:

Advantages

Following are the advantages of dynamic testing:

  • It validates the performance of the software application.
  • The usage of dynamic testing ensures the reliability and constancy of the software product.
  • It can automate with the help of tools that detect the problematic and complex bugs in the testing process, which cannot be covered through static Analysis.
  • It helps the testing team to identify the weak areas of the run-time environment.
  • The most important benefit of using dynamic testing over static testing is the relatively higher number of bugs can be found.
  • As compared to static testing, dynamic testing requires a smaller number of meetings at the planning level of testing.
  • It implements the software, end to end, and delivers Bug-free software.
  • It becomes an essential tool for identifying any security threats.
  • In dynamic testing, we can detect the problematic bugs which may have escaped the review processes.
  • It also identifying those bugs which cannot be noticed by static testing.
  • Dynamic testing can also find security threats, which ensure a better and secure application.

Disadvantages

Following are drawbacks of dynamic testing:

  • It is a time-consumingprocess as it implements the software application or code, which needs a massive resource.
  • The dynamic testing process is a bit costlieras it increases the budget of the software.
  • The dynamic testing needs more human resources to complete the task, which makes its implementation costlier.
  • Generally, dynamic testing is executed after the coding phase is completed, and therefore, the bugs are identified later in the life cycle.

Overview

In the dynamic testing section, we have learned the following topics:

  • After understood the dynamic testing above, we can easily say that the importance of dynamic testing is massive in the software testing life cycle (STLC).
  • Dynamic testing is used to perform the dynamic behavior of the code.
  • We have understood the process of dynamic Testing and the various types of dynamic testing.
  • In dynamic testing, we can directly implement the software tests to verify the functional performance, behavior, reliability, and other significant features of the software.
  • We have understood the advantages and disadvantages of dynamic testing.
Manual Testing

Static Testing

In this section, we are going to understand Static testing, which is used to check the application without executing the code. And we also learn about static Testing, why we use static Testing, how to perform it, a different technique for static Testing, advantages of static testing, and various Static Testing tools.

Introduction to Static Testing

Static testing is a verification process used to test the application without implementing the code of the application. And it is a cost-effective process.

To avoid the errors, we will execute Static testing in the initial stage of development because it is easier to identify the sources of errors, and it can fix easily.

In other words, we can say that Static testing can be done manually or with the help of tools to improve the quality of the application by finding the error at the early stage of development; that is also called the verification process.

We can do some of the following important activities while performing static testing:

  • Business requirement review
  • Design review
  • Code walkthroughs
  • The test documentation review

Note: Static testing is performed in the white box testing phase, where the developer checks every line of the code before giving it to the Test Engineer.

Static testing also helps us to identify those errors which may not be found by Dynamic Testing.

Why do we need to perform Static Testing?

We can perform static testing to fulfill the below aspects:

  • We can use static testing to improve the development productivity.
  • If we performed static testing on an application, we could find the detects in the earlier stages and easily fix them.
  • The usage of static testing will decrease the testing cost, development timescales, and time.

What are the different features we can test in Static Testing?

We can test the various testing activities in Static Testing, which are as follows:

  • BRD [Business Requirements Document]
  • Functional or system Requirements
  • Unit Use Cases
  • Prototype
  • Prototype Specification Document
  • Test Data
  • DB Fields Dictionary Spreadsheet
  • Documentation/Training Guides/ User Manual
  • Test Cases/Test Plan Strategy Document
  • Traceability Matrix Document
  • Performance Test Scripts/Automation

When we performed Static Testing?

To perform static testing, we need to follow the below steps:

Step1: To review the design of the application entirely, we will perform the inspection process.

Step2: After that, we will use a checklist for each document under review to make sure that all reviews are covered completely.

We can also implement several activities while performing static testing, which are discussed in the following table:

ActivitiesExplanation
Architecture ReviewThe architecture review activities contain all business-level processes such as network diagram, load balancing, server locations, protocol definitions, test equipment, database accessibility, etc.
Use Cases Requirements ValidationIt is used to authenticates all the end-user actions along with associated input and output.If the use case is more comprehensive and detailed, we can make more precise and inclusive test cases.
Functional Requirements ValidationThe functional requirement validation activity is used to make sure that all necessary elements identify correctly.And it also took care of the software, interface listings, network requirements, hardware, and database functionality.
Field Dictionary ValidationIn the field dictionary validation, we will test each field in the user interface specified to create field-level validation test cases.And we can check the fields for error messages, minimum or maximum length, list values, etc.
Prototype/Screen Mockup ValidationThe prototype validation activity contains the authentication of requirements and uses cases.

Why we need Static Testing?

We required Static testing whenever we encounter the following situation while testing an application or the software:

  • Dynamic Testing is time-consuming
  • Flaws at earlier stages/identification of Bugs
  • Dynamic Testing is expensive
  • Increased size of the software

Dynamic Testing is time-consuming

We need static testing to test the application as dynamic testing is time-taking process even though the dynamic testing identifies the bug and provides some information about the bug.

Flaws at earlier stages/identification of Bugs

When we are developing the software, we cannot completely rely on Dynamic testing as it finds the bugs or defects of the application/software at a later stage because it will take the programmer’s plenty of time and effort to fix the bugs.

Dynamic Testing is expensive

We need to perform the static testing on the software product because dynamic testing is more expensive than static testing. Involving the test cases is expensive in dynamic testing as the test cases have been created in the initial stages.

And we also need to preserve the implementation and validation of the test case, which takes lots of time from the test engineers.

Increased size of the software

Whenever we test the software, it will increase the size of the software product, which we cannot handle because of the reduction in the productivity of code coverage.

That is why we require static testing to get free from the bugs or defects earlier in the software development life cycle.

Objectives of Static testing

The main objectives of performing static testing is as below:

  • Static testing will decrease the flaws in production.
  • Static testing will identify, anticipate and fix the bugs at the earliest possible time.
  • It is used to save both time and cost.
  • It is used to identify defects in the early stage of SDLC, where we can fix them easily.

Some useful points for Successful Static Testing Process

The following guidelines help us to perform a successful static testing process in Software testing.

  • We can train participants with examples.
  • The testing cost and time can decrease if we delete the major delays in test execution.
  • We can retain the process formal as per the project culture.
  • We can make emphasis only on things that matter.
  • As we know that a software walkthrough and review are usually merged into peer reviews; therefore, we can plan explicitly and track the review activities.
  • We can resolve the client’s problems.

Static Testing Techniques

Static testing techniques offer a great way to enhance the quality and efficiency of software development. The Static testing technique can be done in two ways, which are as follows:

  • Review
  • Static Analysis
Static Testing

Review

In static testing, the review is a technique or a process implemented to find the possible bugs in the application. We can easily identify and eliminate faults and defects in the various supporting documents such as SRS [Software Requirements Specifications] in the review process.

In other words, we can say that a review in Static Testing is that where all the team members will understand about the project’s progress.

In static testing, reviews can be divided into four different parts, which are as follows:

  • Informal reviews
  • Walkthroughs
  • Technical/peer review
  • Inspections
Static Testing

Let’s understand them in detail one by one:

  • Informal reviews
    In informal review, the document designer place the contents in front of viewers, and everyone gives their view; therefore, bugs are acknowledged in the early stage.
  • Walkthrough
    Generally, the walkthrough review is used to performed by a skilled person or expert to verify the bugs. Therefore, there might not be problem in the development or testing phase.
  • Peer review
    In Peer review, we can check one another’s documents to find and resolve the bugs, which is generally done in a team.
  • Inspection
    In review, the inspection is essentially verifying the document by the higher authority, for example, the verification of SRS [software requirement specifications] document.

Static Analysis

Another Static Testing technique is static analysis, which is used to contain the assessment of the code quality, which is established by developers.

We can use the different tools to perform the code’s analysis and evaluation of the same.

In other words, we can say that developers’ developed code is analyzed with some tools for structural bugs, which might cause the defects.

The static analysis will also help us to identify the below errors:

  • Dead code
  • Unused variables
  • Endless loops
  • Incorrect syntax
  • Variable with undefined value

In static testing, Static Analysis can be further classified into three parts, which are as discuss below:

Static Testing

Data Flow: In static analysis, the data flow is connected to the stream processing.

Control Flow: Generally, the control flow is used to specify how the commands or instructions are implemented.

Cyclomatic Complexity: It is the measurement of the program’s complexity, which is mostly linked to the number of independent paths in the control flow graph of the program.

Tools used for Static Testing

In static testing, we have several tools in the market, but here we are discussing the most commonly used tools, which are as follow:

  • CheckStyle
  • SourceMeter
  • Soot

CheckStyle

It is a development tool that is used to help the developers write Java code, which follows a coding standard. The CheckStyle tool automates the process of checking Java code.

It is a highly configured tool, which is made to support almost any coding standard. The Google Java Style, Sun code conventions are those configuration files, which is supported by CheckStyle.

Static Testing

Feature of CheckStyle

Following are the most common features of CheckStyle:

  • It can check various characteristics of our source code.
  • The CheckStyle code has the capability to verify the code layout and formatting issues.
  • It can also help to identify the method design problems, class design problems.

SourceMeter

It is an advanced tool for the specific static source code analysis of various programming languages such as C/C++, C#, Java, Python, and RPG projects.

With the SourceMeter tool’s help, we can easily identify the vulnerable spots of a system under development from the source code.

The free version with partial functionality of SourceMeter can be accessible for all programming languages.

In SourceMeter, we can use the output of the analysis, the quality of the analyzed source code to enhance and developed both the short and long term in a directed way.

Static Testing

Feature of SourceMeter

The most commonly used features of the SourceMeter tool are as follows:

  • It provides the most precise coding error detection.
  • The SourceMeter tool will provide a deep static code analysis.
  • It improved the user interface with the help of third-party integration.
  • It will provide platform-independent command-line tools.

Soot

It is a Java optimization framework, which means that it is a framework for analyzing and transforming Java and Android applications where we can test the following aspects:

  • Named module and modular jar files.
  • Automatic modules, which means the modules are repeatedly created from jars in the module-path.
  • Exploded modules
  • Resolving modules in Soot’s
Static Testing

And a Soot can also produce possibly transformed code in the various output formats such as Android bytecode, Java bytecode Jasmin, and Jimple.

Advantages of Static Testing

The advantages of static testing are as follows:

  • Improved Product quality
    Static testing will enhance the product quality because it identifies the flaws or bugs in the initial stage of software development.
  • Improved the efficiency of Dynamic testing
    The usage of Static testing will improve Dynamic Testing efficiency because the code gets cleaner and better after executing Static Testing.
    As we understood above, static Testing needs some efforts and time to generate and keep good quality test cases.
  • Reduced SDLC cost
    The Static Testing reduced the SDLC cost because it identifies the bugs in the earlier stages of the software development life cycle. So, it needs less hard work and time to change the product and fix them.
  • Immediate evaluation & feedback
    The static testing provides us immediate evaluation and feedback of the software during each phase while developing the software product.
  • Exact location of bug is traced
    When we perform the static testing, we can easily identify the bugs’ exact location compared to the dynamic Testing.

Overview

In the Static testing section, we have learned the following topics:

  • Static testing is used to identify the faults in the early stage of the Software development cycle [SDLC].
  • We have understood that Static Testing is not a replacement for dynamic Testing because both testings identify different bug types.
  • We have understood the objective of Static Testing.
  • In static testing, the reviews are the productive approach to test the application because the reviews help identify the bugs and recognize the design flaws, missing requirements, and non-maintainable code, etc.
  • We have understood several static testing tools, which help us enhance testing performance for the software product.
Manual Testing

Sanity Testing

In this section, we are going to understand the working of sanity testing, which is used to check whether the bugs have been fixed after the build or not.

And we also learn about its process, why we need to perform the sanity testing, the objective of sanity testing, real-time examples, various attributes of sanity testing, advantages, and disadvantages.

What is Sanity Testing?

Generally, Sanity testing is performed on stable builds and it is also known as a variant of regression testing.

Sanity testing was performed when we are receiving software build (with minor code changes) from the development team. It is a checkpoint to assess if testing for the build can proceed or not.

In other words, we can say that sanity testing is performed to make sure that all the defects have been solved and no added issues come into the presence because of these modifications.

Sanity testing also ensures that the modification in the code or functions does not affect the associated modules. Consequently, it can be applied only on connected modules that can be impacted.

The Objective of Sanity Testing

The key objective of implementing sanity testing is to fulfill the following aspects:

Sanity Testing
  • The primary aim of executing the sanity testing is to define that the planned features work unevenly as expected. If the sanity test fails, the build is refused to save the costs and time complexity in more severe testing.
  • The execution of sanity testing makes sure that new modifications don’t change the software’s current functionalities.
  • It also validates the accuracy of the newly added features and components.

Attributes of Sanity Testing

For understanding the fundamental of the sanity testing techniques, we have to learn their attribute and several other components. Hence, following are some of the important features of Sanity testing:

  • Narrow and deep
  • A Subset of Regression Testing
  • Unscripted
  • Not documented
  • Performed by testers
Sanity Testing

Narrow and deep

In software testing, sanity testing is a narrow and deep method where limited components are protected deeply.

Subcategory of Regression Testing

It is a subdivision of regression testing, which mainly emphases on the less important unit of the application.

It is used to test the application efficiency under the requirements of the modification or new features that have been executed.

Unscripted

Generally, sanity testing is unscripted.

Not documented

Typically, sanity testing cannot be documented.

Performed by test engineers

Usually, Sanity testing is done by the test engineers.

Sanity Testing Process

The main purpose of performing sanity testing is to check the incorrect outcomes or defects which are not existing in component procedures. And also, ensure that the newly added features may not affect the functionalities of current features.

Therefore, we need to follow the below steps to implement the sanity testing process gradually:

  • Identification
  • Evaluation
  • Testing
Sanity Testing

Step1: Identification

The first step in the sanity testing process is Identification, where we detect the newly added components and features as well as the modification presented in the code while fixing the bug.

Step2: Evaluation

After completing the identification step, we will analyze newly implemented components, attributes and modify them to check their intended and appropriate working as per the given requirements.

Step3: Testing

Once the identification and evaluation step are successfully processed, we will move to the next step, which is testing.

In this step, we inspect and assess all the linked parameters, components, and essentials of the above analyzed attributed and modified them to make sure that they are working fine.

If all the above steps are working fine, the build can be subjected to more detailed and exhausting testing, and the release can be passed for thorough testing.

Who executes the Sanity testing?

Generally, a sanity test case is executed by the test engineers.

When do we need to perform Sanity testing?

There are no such hard and fast software testing rules to execute the sanity tests process.

It is a quick process of testing the application as it does not include the scripting any of the test cases.

A Sanity testing is a narrow regression test that emphasizes specific areas of the component. And if we encounter the below two conditions, we needed to execute one round of sanity testing, and those conditions are as follows:

Case1

We go for sanity testing whenever there is an improvement in the functionality of the specified software.

Case2

Whenever the bugs have been fixed, or a new feature added, we need to perform sanity testing in order to check whether the application is still working fine or not.

Examples of Sanity Testing

For our better understanding of sanity testing, we will see the below example:

Example 1

Suppose we have an e-commerce application, which contains several modules, but here, we mainly concentrate only a few modules such as the login page, the home page, the new user creation page, the user profile page, etc.

  • While a new user tries to login into the application, he/she is not able to log in, as there is a bug in the login page.
  • Because the password field in the login module accepts less than four alpha-numeric characters and based on the specification, the password field should not be accepted below 7-8 characters.
  • Thus, it is considered as bug, which is reported by the testing team to the development team to fix it.
  • Once the development team fixes the specified bug and reports back to the testing team, the testing team tests the same feature to verify that the modification that happens in the code is working fine or not.
  • And the testing team also verifies that the particular modification does not impact other related functionalities.
  • To modify the password on the user profile page there is a process.
  • As part of the sanity testing process, we must authenticate the login page and the profile page to confirm that the changes are working fine at both the places.

Advantages and Disadvantages of Sanity Testing

Below are some of the vital benefits and drawbacks of Sanity testing.

Advantages of Sanity Testing

Some of the dynamic benefits of performing sanity testing are as follows:

Sanity testing is easy to understand and implement.

  • It helps us to find any deployment or compilation issues.
  • It is less expensive as compared to other types of software testing.
  • It helps in rapidly finding the bugs in the core functionality.
  • There is no documentation mandatory for sanity testing, that’s why it can be executed in lesser time.
  • The execution of sanity testing will help us save unnecessary testing effort and time because it only focused on one or a few functionality areas.
  • Sanity testing helps in detecting the missing dependent objects.

Disadvantages of Sanity testing

Following are the drawbacks of sanity testing:

  • It’s become a very complex process for the developers to understand how to fix the defects acknowledged throughout the sanity testing if they do not follow the design structure level.
  • All the test cases are not covered under sanity testing.
  • It is emphasized only on the statement and functions of the application.
  • We do not have future references since the sanity testing is unscripted.
  • It became a complex process to find any other components as sanity testing is executed only for some limited features.

Overview

In this tutorial, we learned that the execution of the sanity testing, real-time examples, benefits, and drawbacks.

Sanity testing is implemented when a new functionality, modification request, or bug fix is executed in the program.

It is a narrow and deep testing process that is intensive only on those components where the modification has impacted.

Sanity testing is beneficial as it provides various advantages like, it offers a quick assessment of the quality of software release.

Sanity testing allows us to check the application’s small functionality if a minor change occurs in the software.

Manual Testing

Smoke Testing

Smoke Testing comes into the picture at the time of receiving build software from the development team. The purpose of smoke testing is to determine whether the build software is testable or not. It is done at the time of “building software.” This process is also known as “Day 0”.

It is a time-saving process. It reduces testing time because testing is done only when the key features of the application are not working or if the key bugs are not fixed. The focus of Smoke Testing is on the workflow of the core and primary functions of the application.

Testing the basic & critical feature of an application before doing one round of deep, rigorous testing (before checking all possible positive and negative values) is known as smoke testing.

In the smoke testing, we only focus on the positive flow of the application and enter only valid data, not the invalid data. In smoke testing, we verify every build is testable or not; hence it is also known as Build Verification Testing.

When we perform smoke testing, we can identify the blocker bug at the early stage so that the test engineer won’t sit idle, or they can proceed further and test the independent testable modules.

Note:

  • The test engineer knows that the module is independent testable because we have already done one round of smoke testing on them.
  • The development team can take their time to fix the bug, and they are not under pressure because the testing team is not sitting idle, and the release does not get postponed, hence it is a time-saving process.

Process to conduct Smoke Testing

Smoke testing does not require to design test cases. There’s need only to pick the required test cases from already designed test cases.

As mentioned above, Smoke Testing focuses on the workflow of core applications so; we choose test case suits that covers the major functionality of the application. The number of test cases should be minimized as much as possible and time of execution must not be more than half an hour.

When we perform smoke testing

Generally, whenever the new build is installed, we will perform one round of smoke testing because in the latest build, we may encounter the blocker bug. After all, there might be some change that might have broken a major feature (fixing the bug of or adding a new feature could have affected a major portion of the original software), or we do smoke testing where the installation is happening.

When the stable build is installed anywhere (Test Server, Production Server, and User Acceptance testing), we do smoke testing to find the blocker bug.

Smoke Testing

Let’s use some different scenarios, which help us to understand better when to do smoke testing:

Scenarios 1

The developer develops the application and handed over to the testing team, and the testing team will start the functional testing

Suppose we assume that four days we are given to the functional testing. On the first day, we check one module, and on the second day, we will go for another module. And on the fourth day, we find a critical bug when it is given it to the developer; he/she says it will take another two days to fix it. Then we have to postpone the release date for these extra two days.

Smoke Testing

To overcome this problem, we perform smoke testing, let us see how it works, in the above situation, instead of the testing module by module thoroughly and come up with critical bug at the end, it is better to do smoke testing before we go for functional, integration and system testing that is, in each module we have to test for essential or critical features, and then proceed for further testing as we can see in the below images:

Smoke Testing
Smoke Testing

Scenario 2

While performing the functional testing, if the test engineer identifies the major bug in the early stages, sometimes it is not suitable for the developer to find a major bug in the initial stages. So the test engineer will perform the smoke testing before doing the functional, integration, system, and other types of testing.

While doing smoke testing, the test engineer finds the major bug; he/she will give to the development team for fixing the bug. After the bug is fixed, the test engineer will continue for further testing as we can see in the below image:

Smoke Testing

Scenario 3

In this scenario, if we are already perform the smoke testing and found the blocker bug and also resolved that bug. After performing the system testing, we will send the application from the testing server to the end-user server for one round of user acceptance testing. And when the customer performs the acceptance testing and does not find any issues and satisfied with the application because we already perform the smoke testing.

Smoke Testing

Scenarios 4

Once the acceptance testing is done, the application will be deployed to the production server. We have done a round of smoke testing on the production server to check whether the application is installed correctly or not. If any real end-user will found any blocker bug, they will get irritated and will not use the application again, which may lead to the loss of customer business as we can see in the below image:

Smoke Testing

For not getting this problem in the future, the development team manager, the testing team manager, will take the customer login and do one round of smoke testing.

For example, the real user using the Facebook application and every time we got new features updated internally, and the actual user will not affect because they will not aware of the internal changes and use the application properly.

In the production server, smoke testing can be done by the Business analyst (BA), Development team manager, testing team manager, build team, and the customer.

Why we do smoke testing?

  • We will do the smoke testing to ensure that the product is testable.
  • We will perform smoke testing in the beginning and detect the bugs in the basic features and send it to the development team so that the development team will have enough time to fix the bugs.
  • We do smoke testing to make sure that the application is installed correctly.

Note:

  • In the early stage of application development, if we are doing smoke testing, it will fetch more number of bugs. But in the later stage of application development, if we do smoke testing, the number of bugs that we are going to catch in smoke testing will be very less. Therefore, frequently the effort spent on smoke testing is less.
  • When we go for smoke testing on every build?

Whenever a new build is installed, we make sure that build is testable or not, and if it is testable, then we perform smoke testing like as we can see in the below image:

Smoke Testing

Types of smoke testing

Smoke testing is divided into two types:

Formal smoke testing

In this, the development team sends the application to the Test Lead. Then the test lead will instruct the testing team to do smoke testing and send the reports after performing the smoke testing. Once the testing team is done with smoke testing, they will send the smoke testing report to the test lead.

Informal smoke testing

Here, the Test lead says that the application is ready for further testing. The test leads do not specify to do smoke testing, but still, the testing team starts testing the application by doing smoke testing.

Real Time Example:

Suppose, we are using an eCommerce site, and the core working of this site should be login, specific search, add an item into the cart, add an item into the favorite, payment options, etc. Here we are testing function to place an order. After testing, the tester has to be sure and confident about the functioning of the function of the application.

Steps of the workflow are given below:

  • Click on item
  • Description page should be open.
  • Click on Add to Cart
  • The cart should be open
  • Click on Buy Now
  • Payment options should be displayed. Choose one of them.
  • Order placed
Smoke Testing

If this function is working correctly, then tester will pass it in testing and test the next function of the same application.

Advantages of smoke testing

  • It is a time-saving process.
  • In the early stage, we can find the bugs.
  • It will help to recover the quality of the system, which decreases the risk.
  • It is easy testing to perform because it saves our test effort and time.
Manual Testing

Regression Testing

What is regression testing?

Regression testing is a black box testing techniques. It is used to authenticate a code change in the software does not impact the existing functionality of the product. Regression testing is making sure that the product works fine with new functionality, bug fixes, or any change in the existing feature.

Regression testing is a type of software testing. Test cases are re-executed to check the previous functionality of the application is working fine, and the new changes have not produced any bugs.

Regression testing can be performed on a new build when there is a significant change in the original functionality. It ensures that the code still works even when the changes are occurring. Regression means Re-test those parts of the application, which are unchanged.

Regression tests are also known as the Verification Method. Test cases are often automated. Test cases are required to execute many times and running the same test case again and again manually, is time-consuming and tedious too.

Example of Regression testing

Here we are going to take a case to define the regression testing efficiently:

Consider a product Y, in which one of the functionality is to trigger confirmation, acceptance, and dispatched emails. It also needs to be tested to ensure that the change in the code not affected them. Regressing testing does not depend on any programming language like Java, C++, C#, etc. This method is used to test the product for modifications or any updates done. It ensures that any change in a product does not affect the existing module of the product. Verify that the bugs fixed and the newly added features not created any problem in the previous working version of the Software.

When can we perform Regression Testing?

We do regression testing whenever the production code is modified.

We can perform regression testing in the following scenario, these are:

1. When new functionality added to the application.

Example:

A website has a login functionality which allows users to log in only with Email. Now providing a new feature to do login using Facebook.

2. When there is a Change Requirement.

Example:

Remember password removed from the login page which is applicable previously.

3. When the defect fixed

Example:

Assume login button is not working in a login page and a tester reports a bug stating that the login button is broken. Once the bug fixed by developers, tester tests it to make sure Login Button is working as per the expected result. Simultaneously, tester tests other functionality which is related to the login button.

4. When there is a performance issue fix

Example:

Loading of a home page takes 5 seconds, reducing the load time to 2 seconds.

5. When there is an environment change

Example:

When we update the database from MySql to Oracle.

How to perform Regression Testing?

The need for regression testing comes when software maintenance includes enhancements, error corrections, optimization, and deletion of existing features. These modifications may affect system functionality. Regression Testing becomes necessary in this case.

Regression testing can be performed using the following techniques:

regression testing

1. Re-test All:

Re-Test is one of the approaches to do regression testing. In this approach, all the test case suits should be re-executed. Here we can define re-test as when a test fails, and we determine the cause of the failure is a software fault. The fault is reported, we can expect a new version of the software in which defect fixed. In this case, we will need to execute the test again to confirm that the fault fixed. This is known as re-testing. Some will refer to this as confirmation testing.

The re-test is very expensive, as it requires enormous time and resources.

2. Regression test Selection:

  • In this technique, a selected test-case suit will execute rather than an entire test-case suit.
  • The selected test case suits divided in two cases
    1. Reusable Test cases.
    2. Obsolete Test cases.
  • Reusable test cases can use in succeeding regression cycle.
  • Obsolete test cases can’t use in succeeding regression cycle.

3. Prioritization of test cases:

Prioritize the test case depending on business impact, critical and frequently functionality used. Selection of test cases will reduce the regression test suite.

What are the Regression Testing tools?

Regression Testing is a vital part of the QA process; while performing the regression we may face the below challenges:

  • Time Consuming
    Regression Testing consumes a lot of time to complete. Regression testing involves existing tests again, so testers are not excited to re-run the test.
  • Complex
    Regression Testing is complex as well when there is a need to update any product; lists of the test are also increasing.
  • Communicating business rule
    Regression Testing ensures the existing product features are still in working order. Communication about regression testing with a non-technical leader can be a difficult task. The executive wants to see the product move forward and making a considerable time investment in regression testing to ensure existing functionality working can be hard.
  • Identify Impact Area
  • Test Cases Increases Release by Release
  • Less Resources
  • No Accuracy
  • Repetitive Task
  • Monotonous Job

Regression testing process

The regression testing process can be performed across the builds and the releases.

Regression testing across the builds

Whenever the bug fixed, we retest the Bug, and if there is any dependent module, we go for a Regression Testing.

regression testing

For example, How we perform the regression testing if we have different builds as Build 1, Build 2, and Build 3, which having different scenarios.

Build1

  • Firstly the client will provide the business needs.
  • Then the development team starts developing the features.
  • After that, the testing team will start writing the test cases; for example, they write 900 test cases for the release#1 of the product.
  • And then, they will start implementing the test cases.
  • Once the product is released, the customer performs one round of acceptance testing.
  • And in the end, the product is moved to the production server.

Build2

  • Now, the customer asks for 3-4 extra (new) features to be added and also provides the requirements for the new features.
  • The development team starts developing new features.
  • After that, the testing team will start writing the test case for the new features, and they write about 150 new test cases. Therefore, the total number of the test case written is 1050 for both the releases.
  • Now the testing team starts testing the new features using 150 new test cases.
  • Once it is done, they will begin testing the old features with the help of 900 test cases to verify that adding the new feature has damaged the old features or not.
  • Here, testing the old features is known as Regression Testing.
  • Once all the features (New and Old) have been tested, the product is handed over to the customer, and then the customer will do the acceptance testing.
  • Once the acceptance testing is done, the product is moved to the production server.

Build3

  • After the second release, the customer wants to remove one of the features like Sales.
  • Then he/she will delete all the test cases which are belonging to the sales module (about 120 test cases).
  • And then, test the other feature for verifying that if all the other features are working fine after removing the sales module test cases, and this process is done under the regression testing.

Note:

  • Testing the stable features to ensure that it is broken because of the changes. Here changes imply that the modification, addition, bug fixing, or the deletion.
  • Re-execution of the same test cases in the different builds or releases is to ensure that changes (modification, addition, bug fixing, or the deletion) are not introducing bugs in stable features.

Regression testing across the release

The regression testing process starts whenever there is a new Release for same project because the new feature may affect the old elements in the previous releases.

To understand the regression testing process, we will follow the below steps:

Step1

There is no regression testing in Release#1 because there is no modification happen in the Release#1 as the release is new itself.

Step2

The concept of Regression testing starts from Release#2 when the customer gives some new requirements.

Step3

After getting the new requirements (modifying features) first, they (the developers and test engineers) will understand the needs before going to the impact analysis.

Step4

After understanding the new requirements, we will perform one round of impact analysis to avoid the major risk, but here the question arises who will do the Impact analysis?

Step5

The impact analysis is done by the customer based on their business knowledge, the developer based on their coding knowledge, and most importantly, it is done by the test engineer because they have the product knowledge.

Note: If a single person does, he/she may not cover all the impact areas, so we include all persons so that we may cover a maximum impact area, and Impact Analysis should be done at the early stages of the releases.

Step6

Once we are done with the impact area, then the developer will prepare the impact area (document), and the customer will also prepare the impact area document so that we can achieve the maximum coverage of impact analysis.

Step7

After completing the impact analysis, the developer, the customer, and the test engineer will send the Reports# of the impact area documents to the Test Lead. And in the meantime, the test engineer and the developer are busy working on the new test case.

Step8

Once the Test lead gets the Reports#, he/she will consolidate the reports and stored in the test case requirement repository for the release#1.

Note: Test case Repository: Here, we will save all the test case of releases.

Step9

After that, the Test Lead will take the help of RTM and pick the necessary regression test case from the test case repository, and those files will be placed in the Regression Test Suite.

Note:

  • The test lead will store the regression test case in the regression test suite for no further confusion.
  • Regression test suite: Here, we will save all the impact area test documents.
  • Regression Test Cases: These are the test cases of the old releases text document which need to be re-executed as we can see in the below image:
regression testing

Step10

After that, when the test engineer has done working on the new test cases, the test lead will assign the regression test case to the test engineer.

Step11

When all the regression test cases and the new features are stable and pass, then check the impact area using the test case until it is durable for old features plus the new features, and then it will be handed over to the customer.

regression testing

Types of Regression Testing

The different types of Regression Testing are as follows:

  • Unit Regression Testing [URT]
  • Regional Regression Testing[RRT]
  • Full or Complete Regression Testing [FRT]
regression testing

Unit Regression Testing [URT]

In this, we are going to test only the changed unit, not the impact area, because it may affect the components of the same module.

Example1

In the below application, and in the first build, the developer develops the Search button that accepts 1-15 characters. Then the test engineer tests the Search button with the help of the test case design technique.

regression testing

Now, the client does some modification in the requirement and also requests that the Search button can accept the 1-35 characters. The test engineer will test only the Search button to verify that it takes 1-35 characters and does not check any further feature of the first build.

Example2

Here, we have Build B001, and a defect is identified, and the report is delivered to the developer. The developer will fix the bug and sends along with some new features which are developed in the second Build B002. After that, the test engineer will test only after the defect is fixed.

  • The test engineer will identify that clicking on the Submit button goes to the blank page.
  • And it is a defect, and it is sent to the developer for fixing it.
  • When the new build comes along with the bug fixes, the test engineer will test only the Submit button.
  • And here, we are not going to check other features of the first build and move to test the new features and sent in the second build.
  • We are sure that fixing the Submitbutton is not going to affect the other features, so we test only the fixed bug.
regression testing

Therefore, we can say that by testing only the changed feature is called the Unit Regression Testing.

Regional Regression testing [RRT]

In this, we are going to test the modification along with the impact area or regions, are called the Regional Regression testing. Here, we are testing the impact area because if there are dependable modules, it will affect the other modules also.

For example:

In the below image as we can see that we have four different modules, such as Module A, Module B, Module C, and Module D, which are provided by the developers for the testing during the first build. Now, the test engineer will identify the bugs in Module D. The bug report is sent to the developers, and the development team fixes those defects and sends the second build.

regression testing

In the second build, the previous defects are fixed. Now the test engineer understands that the bug fixing in Module D has impacted some features in Module A and Module C. Hence, the test engineer first tests the Module D where the bug has been fixed and then checks the impact areas in Module A and Module C. Therefore, this testing is known as Regional regression testing.

While performing the regional regression testing, we may face the below problem:

Problem:

In the first build, the client sends some modification in requirement and also wants to add new features in the product. The needs are sent to both the teams, i.e., development and testing.

After getting the requirements, the development team starts doing the modification and also develops the new features based on the needs.

Now, the test lead sends mail to the clients and asks them that all are the impact areas that will be affected after the necessary modification have been done. Therefore, the customer will get an idea, which all features are needed to be tested again. And he/she will also send a mail to the development team to know which all areas in the application will be affected as a result of the changes and additions of new features.

And similarly, the customer sends a mail to the testing team for a list of impact areas. Hence, the test lead will collect the impact list from the client, development team, and the testing team as well.

This Impact list is sent to all the test engineers who look at the list and check if their features are modified and if yes, then they do regional regression testing. The impact areas and modified areas are all tested by the respective engineers. Every test engineer tests only their features that could have been affected as a result of the modification.

The problem with this above approach is that the test lead may not get the whole idea of the impact areas because the development team and the client may not have so much time to revert his/her mails.

Solution

To resolve the above problem, we will follow the below process:

When a new build comes along with the latest features and bug fixes, the testing team will arrange the meeting where they will talk about if their features are affecting because of the above modification. Therefore, they will do one round of Impact Analysis and generate the Impact List. In this particular list, the test engineer tries to enclose the maximum probable impact areas, which also decreases the chance of getting the defects.

When a new build comes, the testing team will follow the below procedure:

  • They will do smoke testing to check the basic functionality of an application.
  • Then they will test new features.
  • After that, they will check the changed features.
  • Once they are done with checking the changed features, the test engineer will re-test the bugs.
  • And then they will check the impact area by performing the regional regression testing.

Disadvantage of using Unit and Regional Regression testing

Following are some of the drawbacks of using unit and Regional regression testing:

  • We may miss some impact area.
  • It is possible that we may identify the wrong impact area.

Note: We can say that the major work we do on the regional regression testing will lead us to get more number of defects. But, if we will perform the same dedication to work on the full regressing testing, we will get less number of defects. Therefore, we can determine here that enhancement in the testing effort will not help us to get more defects.

Full Regression testing [FRT]

During the second and the third release of the product, the client asks for adding 3-4 new features, and also some defects need to be fixed from the previous release. Then the testing team will do the Impact Analysis and identify that the above modification will lead us to test the entire product.

Therefore, we can say that testing the modified features and all the remaining (old) features is called the Full Regression testing.

regression testing

When we perform Full Regression testing?

We will perform the FRT when we have the following conditions:

  • When the modification is happening in the source file of the product. For example, JVM is the root file of the JAVA application, and if any change is going to happen in JVM, then the entire JAVA program will be tested.
  • When we have to perform n-number of changes.

Note:

The regional regression testing is the ideal approach of regression testing, but the issue is, we may miss lots of defects while performing the Regional Regression testing.

And here we are going to solve this issue with the help of the following approach:

  • When the application is given for the testing, the test engineer will test the first 10-14 cycle, and will do the RRT.
  • Then for the 15th cycle, we do FRT. And again, for the next 10-15 cycle, we do Regional regression testing, and for the 31th cycle, we do the full regression testing, and we will continue like this.
  • But for the last ten cycle of the release, we will perform only complete regression testing.

Therefore, if we follow the above approach, we can get more defects.

The drawback of doing regression testing manually repeatedly:

  • Productivity will decrease.
  • It is a difficult job to do.
  • There is no consistency in test execution.
  • And the test execution time is also increased.

Hence, we will go for the automation to get over with these issues; when we have n-number of the regression test cycle, we will go for the automation regression testing process.

Automated Regression testing process

Generally we go for the automation whenever there are multiple releases or multiple regression cycle or there is the repetitive task.

The automation regression testing process can be done in the following steps:

Note1:

The process of testing the application by using some tools is known as automation testing.

Suppose if we take one sample example of a Login module, then how we can perform the regression testing.

Here, the Login can be done in two ways, which are as follows:

regression testing

Manually: In this, we will perform regression only one and twice.

Automation: In this, we will do the automation multiple times as we have to write the test scripts and do the execution.

Note2: In real-time, if we have faced some issues such as:

IssuesHandle by
New featuresManual test engineer
Regressing testing featuresAutomation test engineer
Remaining ( 110 feature + Release#1)Manual test engineer

Step1

When the new release starts, we don’t go for the automation because there is no concept of regression testing and regression test case as we understood this in the above process.

Step2

When the new release and the enhancement starts, we have two teams, i.e., manual team and the automation team.

Step3

The manual team will go through the requirements and also identify the impact area and hand over the requirement test suite to the automation team.

Step4

Now, the manual team starts working on the new features, and the automation team will start developing the test script and also start automating the test case, which means that the regression test cases will be converted into the test script.

Step5

Before they (automation team) start automating the test case, they will also analyze which all cases can be automated or not.

Step6

Based on the analysis, they will start the automation i.e., converting every regression test cases into the test script.

Step7

During this process, they will take help of the Regression cases because they don’t have product knowledge as well as the tool and the application.

Step8

Once the test script is ready, they will start the execution of these scripts on the new application [old feature]. Since, the test script is written with the help of the regression feature or the old feature.

Step9

Once the execution is completed, we get a different status like Pass/fail.

Step10

If the status is failed, which means it needs to be re-confirmed manually, and if the Bug exists, then it will report to the concerned developer. When the developer fixes that bug, the Bug needs to be re-tested along with the Impact area by the manual test engineer, and also the script needs to be re-executed by the automation test engineer.

Step11

This process goes on until all the new features, and the regression feature will be passed.

regression testing

Benefits of doing regression testing by the automation testing:

  • Accuracy always exists because the task is done by the tools and tools never get bored or tired.
  • The test script can be re-used across multiple releases.
  • Batch execution is possible using the automation i.e.; all the written test scripts can be executed parallel or simultaneously.
  • Even though the number of regression test case increase release per release, and we don’t have to increase the automation resource since some regression case are already automated from the previous release.
  • It is a time-saving process because the execution is always faster than the manual method.

How to select test cases for regression testing?

It was found from industry inspection. The several defects reported by the customer were due to last-minute bug fixes. These creating side effects and hence selecting the Test Case for regression testing is an art, not an easy task.

Regression test can be done by:

  • A test case which has frequent defects
  • Functionalities which are more visible to users.
  • Test cases verify the core features of the product.
  • All integration test cases
  • All complex test cases
  • Boundary value test cases
  • A sample of successful test cases
  • Failure of test cases

Regression testing tools

If Software undergoes frequent changes, regression testing costs also increase. In those cases, manual execution of test cases increases test execution time as well as costs. In that case, automation testing is the best choice. The duration of automation depends on the number of test cases that remain reusable for successive regression cycles.

Following are the essential tools used for regression testing:

Selenium

Selenium is an open-source tool. This tool used for automated testing of a web application. For browser-based regression testing, selenium used. Selenium used for UI level regression test for web-based application.

Ranorex Studio

All in one regression test automation for desktop, web, and mobile apps with built-in Selenium Web Driver. Ranorex Studio includes full IDE plus tools for codeless automation.

Quick Test Professional (QTP)

QTP is an automated testing tool used for Regression and Functional Testing. It is a Data-Driven, keyword-based tool. It used VBScript language for automation. If we open the QTP tool, we see the three buttons which are Record, Play and Stop. These buttons help to record every click and action performed on the computer system. It records the actions and play it back.

regression testing

Rational Functional Tester (RTF)

Rational functional tester is a Java tool used to automate the test cases of software applications. RTF used for automating regression test cases, and it also integrates with the rational functional tester.

For more information about regression and automation testing tools refer to the below link:

https://www.javatpoint.com/automation-testing-tool

What are the Regression Testing and Configuration Management?

Configuration Management in the regression testing becomes imperative in Agile Environments, where a code is continuously modified. To ensure a valid regression test, we must follow the steps:

  • Changes are not allowed in the code during the regression testing phase.
  • A regression test case must be unaffected developer changes.
  • The database used for regression testing must be isolated; changes are not allowed in the database.

What are the differences between Retesting and Regression Testing?

Re-testing Testing means testing the functionality or bug again to ensure the code fixed. If not set, defects need not be re-opened. If fixed, the defect closed.

Re-testing is a type of testing which performed to check the test-cases that were unsuccessful in the final execution are successfully pass after the defects repaired.

Regression Testing means testing the software application when it undergoes a code change to ensure that new code has not affected other parts of the Software.

Regression testing is a type of testing executed to check whether a code has not changed the existing functionality of the application.

Differences between the Re-testing and Regression Testing are as follows:

Re-testingRegression Testing
Re-testing is performed to ensure that the test cases that are failed in the final execution are passing after the defects fixed.Regression Testing is done to confirm whether the code change has not affected the existing features.
Re-Testing works on defect fixes.The purpose of regression testing is to ensure that the code changes adversely not affect the existing functionality.
Defect verification is the part of the Retesting.Regression testing does not include defect verification
The priority of Retesting is higher than Regression Testing, so it is done before the Regression Testing.Based on the project type and availability of resources, regression testing can be parallel to Retesting.
Re-Test is a planned Testing.Regression testing is a generic Testing.
We cannot automate the test-cases for Retesting.We can do automation for regression testing; manual testing could be expensive and time-consuming.
Re-testing is for failed test-cases.Regression testing is for passed Test-cases.
Re-testing make sure that the original fault is corrected.Regression testing checks for unexpected side effect.
Retesting executes defects with the same data and the same environment with different input with a new build.Regression testing is when there is a modification or changes become mandatory in an existing project.
Re-testing cannot do before start testing.Regression testing can obtain test cases from the functional specification, user tutorials and manuals, and defects reports in regards to the corrected problem.

What are the advantages of Regression Testing?

Advantages of Regression Testing are:

  • Regression Testing increases the product’s quality.
  • It ensures that any bug fix or changes do not impact the existing functionality of the product.
  • Automation tools can be used for regression testing.
  • It makes sure the issues fixed do not occur again.

What are the disadvantages of Regression Testing?

There are several advantages of Regression Testing though there are disadvantages as well.

  • Regression Testing should be done for small changes in the code because even a slight change in the code can create issues in the existing functionality.
  • If in case automation is not used in the project for testing, it will time consuming and tedious task to execute the test again and again.

Conclusion

Regression Testing is one of the essential aspects as it helps to deliver a quality product which saves organizations time and money. It helps to provide a quality product by making sure that any change in the code does not affect the existing functionality.

For automating the regression test cases, there are several automation tools available. A tool should have the ability to update the test suite as the regression test suit needs to be updated frequently.