TestNG Tutorial | What is Annotations & Framework in…
What is TestNG?
TestNG is an automation testing framework in which NG stands for “Next Generation”. TestNG is inspired by JUnit which uses the annotations (@). TestNG overcomes the disadvantages of JUnit and is designed to make end-to-end testing easy.
Using TestNG, you can generate a proper report, and you can easily come to know how many test cases are passed, failed, and skipped. You can execute the failed test cases separately.
For example:
- Suppose, you have five test cases, one method is written for each test case (Assume that the program is written using the main method without using testNG). When you run this program first, three methods are executed successfully, and the fourth method is failed. Then correct the errors present in the fourth method, now you want to run only fourth method because first three methods are anyway executed successfully. This is not possible without using TestNG.
- The TestNG in Selenium provides an option, i.e., testng-failed.xml file in test-output folder. If you want to run only failed test cases means you run this XML file. It will execute only failed test cases.
Beside above concept, you will learn more on TestNG, like what are the Advantages of TestNG, how to create test methods using @test annotations, how to convert these classes into testing suite file and execute through the eclipse as well as from the command line.
Why Use TestNG with Selenium?
Default Selenium tests do not generate a proper format for the test results. Using TestNG in Selenium, we can generate test results.
Most Selenium users use this more than Junit because of its advantages. There are so many features of TestNG, but we will only focus on the most important ones that we can use in Selenium. Following are the key features of Selenium TestNG:
- Generate the report in a proper format including a number of test cases runs, the number of test cases passed, the number of test cases failed, and the number of test cases skipped.
- Multiple test cases can be grouped more easily by converting them into testng.xml file. In which you can make priorities which test case should be executed first.
- The same test case can be executed multiple times without loops just by using keyword called ‘invocation count.’
- Using testng, you can execute multiple test cases on multiple browsers, i.e., cross browser testing.
- The TestNG framework can be easily integrated with tools like TestNG Maven, Jenkins, etc.
- Annotations used in the testing are very easy to understand ex: @BeforeMethod, @AfterMethod, @BeforeTest, @AfterTest
- WebDriver has no native mechanism for generating reports. TestNG can generate the report in a readable format like the one shown below.
- TestNG simplifies the way the tests are coded. There is no more need for a static main method in our tests. The sequence of actions is regulated by easy-to-understand annotations that do not require methods to be static.
- Uncaught exceptions are automatically handled by TestNG without terminating the test prematurely. These exceptions are reported as failed steps in the report.
Advantages of TestNG over JUnit
There are three major advantages of TestNG over JUnit:
- Annotations are easier to understand
- Test cases can be grouped more easily
- Parallel testing is possible
What is Annotation in TestNG?
Annotations in TestNG are lines of code that can control how the method below them will be executed. They are always preceded by the @ symbol. A very early and quick TestNG Example is the one shown below.

Annotations will be discussed later in the section named “Annotations used in TestNG,”so it is perfectly ok if you do not understand the above TestNG Example just yet. It is just important to note for now that annotations in TestNG are easier to code and understand than in JUnit.
The ability to run tests in parallel is available in TestNG but not in JUnit, so the TestNG framework is more preferred for testers using Selenium Grid.
How to Write Test Cases in TestNG?
Step 1) Write your business logic and insert the TestNG annotations in your code.
Step 2) Add more information like class name, groups name, package name, etc
Step 3) Run the TestNG.
Create Test Case Using TestNG Annotations
Now, we will learn how to create our first test case using TestNG Annotations in Selenium:
Before we create a test case, we should first setup a new TestNG Project in Eclipse and name it as “FirstTestNGProject”.
Setting up a new TestNG Project
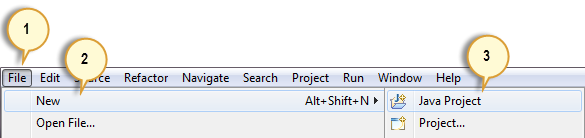
Step 1: Click File > New > Java Project
Step 2: Type “FirstTestNGProject” as the Project Name then click Next.

Step 3: We will now start to import the TestNG Libraries onto our project. Click on the “Libraries” tab, and then “Add Library…”

Step 4: On the Add Library dialog, choose “TestNG” and click Next.

Step 5: Click Finish.

You should notice that TestNG is included on the Libraries list.

Step 6: We will now add the JAR files that contain the Selenium API. These files are found in the Java client driver that we downloaded from https://www.selenium.dev/downloads/ when we were installing Selenium and Eclipse in the previous chapters.

Then, navigate to where you have placed the Selenium JAR files.

After adding the external JARs, your screen should look like this.

Step 7: Click Finish and verify that our FirstTestNGProject is visible on Eclipse’s Package Explorer window.

How to Create a New TestNG Test File
Now that we are done setting up our project in this TestNG tutorial, let us create a new TestNG file.
Step 1: Click on ‘src’ and Choose other.
Right-click on the “src” package folder then choose New > Other…

Step 2: Select TestNG class.
Click on the TestNG folder and select the “TestNG class” option. Click Next.

Step 3: Type the values.
Type the values indicated below on the appropriate input boxes and click Finish. Notice that we have named our Java file as “FirstTestNGFile”.

Step 4: Template Created.
Eclipse should automatically create the template for our TestNG file shown below.

Coding of our First TestNG Test Case Example
Let us now create our first Test Case that will check if Mercury Tours’ homepage is correct. Type your code as shown in the below TestNG Example:
package firsttestngpackage;
import org.openqa.selenium.*;
import org.openqa.selenium.firefox.FirefoxDriver;
import org.testng.Assert;
import org.testng.annotations.*;

public class firsttestngfile {
    public String baseUrl = "http://demo.guru99.com/test/newtours/";
    String driverPath = "C:\\geckodriver.exe";
    public WebDriver driver ;

  @Test
  public void verifyHomepageTitle() {

      System.out.println("launching firefox browser");
      System.setProperty("webdriver.gecko.driver", driverPath);
      driver = new FirefoxDriver();
      driver.get(baseUrl);
      String expectedTitle = "Welcome: Mercury Tours";
      String actualTitle = driver.getTitle();
      Assert.assertEquals(actualTitle, expectedTitle);
      driver.close();
  }
}
Notice the following.
- TestNG does not require you to have a main() method.
- Methods need not be static.
- We used the @Test annotation. @Test is used to tell that the method under it is a test case. In this case, we have set the verifyHomepageTitle() method to be our test case, so we placed an ‘@Test’ annotation above it.
- Since we use annotations in TestNG, we needed to import the package org.testng.annotations.*.
- We used the Assert class. The Assert class is used to conduct verification operations in TestNG. To use it, we need to import the org.testng.Assert package.
You may have multiple test cases (therefore, multiple @Test annotations) in a single TestNG file. This will be tackled in more detail later in the section “Annotations used in TestNG.”
Running the Test
To run the test, simply run the file in Eclipse as you normally do. Eclipse will provide two outputs – one in the Console window and the other on the TestNG Results window.


Checking reports created by TestNG
The Console window in Eclipse gives a text-based report of our test case results while the TestNG Results window gives us a graphical one.

Generating HTML Reports
TestNG has the ability to generate reports in HTML format.
Step 1: After running our FirstTestNGFile that we created in the previous section, right-click the project name (FirstTestNGProject) in the Project Explorer window then click on the “Refresh” option.

Step 2: Notice that a “test-output” folder was created. Expand it and look for an index.html file. This HTML file is a report of the results of the most recent test run.

Step 3: Double-click on that index.html file to open it within Eclipse’s built-in web browser. You can refresh this page any time after you rerun your test by simply pressing F5 just like in ordinary web browsers.

Annotations used in TestNG
In the previous section, you have been introduced to the @Test annotation. Now, we shall be studying more advanced annotations and their usages.
Multiple Test Cases
We can use multiple @Test annotations in a single TestNG file. By default, methods annotated by @Test are executed alphabetically. See the code below. Though the methods c_test, a_test, and b_test are not arranged alphabetically in the code, they will be executed as such.

Run this code and on the generated index.html page, click “Chronological view.”

Parameters
If you want the methods to be executed in a different order, use the parameter “priority”. Parameters are keywords that modify the annotation’s function.
- Parameters require you to assign a value to them. You do.this by placing a “=” next to them, and then followed by the value.
- Parameters are enclosed in a pair of parentheses which are placed right after the annotation like the code snippet shown below.

TestNG will execute the @Test annotation with the lowest priority value up to the largest. There is no need for your priority values to be consecutive.

The TestNG HTML report will confirm that the methods were executed based on the ascending value of priority.

Multiple Parameters
Aside from “priority,” @Test has another parameter called “alwaysRun” which can only be set to either “true” or “false.” To use two or more parameters in a single annotation, separate them with a comma such as the one shown below.
@Test(priority = 0, alwaysRun = true)

@BeforeTest and @AfterTest
| @BeforeTest | methods under this annotation will be executed prior to the first test case in the TestNG file. |
| @AfterTest | methods under this annotation will be executed after all test cases in the TestNG file are executed. |
Consider the code below.
package firsttestngpackage;
import org.openqa.selenium.*;
import org.openqa.selenium.firefox.FirefoxDriver;
import org.testng.Assert;
import org.testng.annotations.*;
public class firsttestngfile {
    public String baseUrl = "http://demo.guru99.com/test/newtours/";
    String driverPath = "C:\\geckodriver.exe";
    public WebDriver driver ;

     @BeforeTest
      public void launchBrowser() {
          System.out.println("launching firefox browser");
          System.setProperty("webdriver.gecko.driver", driverPath);
          driver = new FirefoxDriver();
          driver.get(baseUrl);
      }
      @Test
      public void verifyHomepageTitle() {
          String expectedTitle = "Welcome: Mercury Tours";
          String actualTitle = driver.getTitle();
          Assert.assertEquals(actualTitle, expectedTitle);
     }
      @AfterTest
      public void terminateBrowser(){
          driver.close();
      }
}
Applying the logic presented by the table and the code above, we can predict that the sequence by which methods will be executed is:
- 1st – launchBrowser()
- 2nd – verifyHomepageTitle()
- 3rd – terminateBrowser()
The placement of the annotation blocks can be interchanged without affecting the chronological order by which they will be executed.
Summary of TestNG Annotations
@BeforeSuite: The annotated method will be run before all tests in this suite have run.
@AfterSuite: The annotated method will be run after all tests in this suite have run.
@BeforeTest: The annotated method will be run before any test method belonging to the classes inside the tag is run.
@AfterTest: The annotated method will be run after all the test methods belonging to the classes inside the tag have run.
@BeforeGroups: The list of groups that this configuration method will run before. This method is guaranteed to run shortly before the first test method that belongs to any of these groups is invoked.
@AfterGroups: The list of groups that this configuration method will run after. This method is guaranteed to run shortly after the last test method that belongs to any of these groups is invoked.
@BeforeClass: The annotated method will be run before the first test method in the current class is invoked.
@AfterClass: The annotated method will be run after all the test methods in the current class have been run.
@BeforeMethod: The annotated method will be run before each test method.
@AfterMethod: The annotated method will be run after each test method.
@Test: The annotated method is a part of a test case