Automation Testing

Basic Authentication in Rest Assured

In this article, we will cover the handling of basic authentication in Rest Assured. We will focus on the below points-

  • What is Basic Authentication(Auth)?
  • What are the different authentication schemes provided by Rest Assured?
    • Basic Authentication in Rest Assured.
      • Preemptive Authentication.
    • Digest Authentication.
    • Form Authentication.
    • OAuth Authentication.
      • OAuth1
      • OAuth2

What is Basic Authentication (Auth)?

While going through the previous tutorials you must have noticed that we have used the username and the password (authentication credentials) for certain APIs. This credential setting is to enforce access control for the web resources and is generally passed in the header field of an HTTP request. The implementation of basic authentication is to ensure that the APIs are secured and only the users who are authorized have the access to view them. Hence, the authentication information is not encrypted or hashed but encoded as base-64. We will now see the different schemes used in Rest Assured for authentication and you may go through our previous article on Authentication and Authorization for more information.

What are the different authentication schemes provided by Rest Assured?

To test and validate any secured API, you will have to use some authentication scheme. Rest Assured provides several authentication schemes which we are going to discuss in this part.

Before proceeding to understand the use of authentication in Rest Assured, let us execute our Rest Assured test without using any sort of authentication. Below is the code for your reference-

package org.example;
import org.testng.annotations.Test;

import io.restassured.RestAssured;
import io.restassured.response.Response;
import io.restassured.response.ResponseBody;
import io.restassured.specification.RequestSpecification;

public class BasicAuth {

    @Test
    public void getData() {
        RequestSpecification httpRequest = RestAssured.given();
        Response res = httpRequest.get("https://postman-echo.com/basic-auth");
        ResponseBody body = res.body();
        //Converting the response body to string
        String rbdy = body.asString();
        System.out.println("Data from the GET API- "+rbdy);
    }
}

The code is pretty simple and uses the get () method to send requests to the server. Do not worry if you don’t understand. It will be explained in the later examples. On executing this code the result would be-

rest_assured_basic_auth

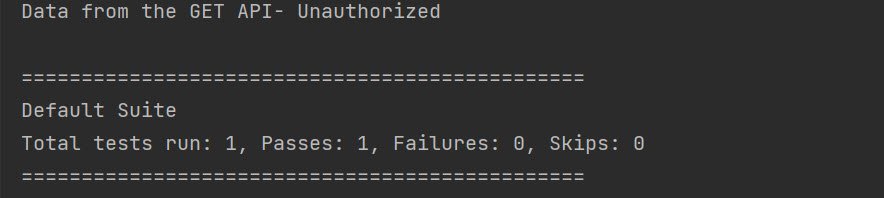
Observe the message in the first line – “Data from the GET API – Unauthorized”. This is the issue that we are going to fix using the basic authentication in our rest assured tests. Let us quickly jump on to understanding the same.

Basic Authentication in Rest Assured

As discussed above, the basic authentication scheme uses the username and password in base64 encoded format. The request header needs to contain the credentials of the user for access to the resource. It is very easy to send the credentials using the basic auth and you may use the below syntax-

given().auth().basic("your username", "your password").get("your end point URL");

In the given method you need to append the method of authentication specification followed by the basic HTTP auth where you will pass the credentials as the parameters. Another type of basic authentication is preemptive which we will discuss next.

package org.example;
import org.testng.annotations.Test;

import io.restassured.RestAssured;
import io.restassured.response.Response;
import io.restassured.response.ResponseBody;
import io.restassured.specification.RequestSpecification;

public class BasicAuth {

    @Test
    public void getData() {
       RequestSpecification httpRequest = RestAssured.given().auth().basic("postman", "password"); 
       Response res = httpRequest.get("https://postman-echo.com/basic-auth");
       ResponseBody body = res.body();
       //Converting the response body to string
       String rbdy = body.asString();
       System.out.println("Data from the GET API- "+rbdy);
    }
}

Preemptive Authentication

By default, Rest Assured uses the challenge-response mechanism. This means that it waits for the server to challenge rather than send the credentials directly. By using the preemptive directives we can avoid that additional call that the server makes and hence additional complications. In a way, it is similar to the basic auth we saw above, the only difference is that an additional premptive () directive adds after auth (). Let us see its syntax followed by a working code example.

given().auth().preemptive().basic("your username", "your password").get("your end point URL");

As you may see above, the preemptive authentication view sends the authentication details in the request header irrespective of being asked by the server. In the same line of implementation, we will see a simple API that uses preemptive authentication.

package org.example;
import org.testng.annotations.Test;

import io.restassured.RestAssured;
import io.restassured.response.Response;
import io.restassured.response.ResponseBody;
import io.restassured.specification.RequestSpecification;

public class BasicAuth {
    @Test
    public void getUserData() {
        //Using the preemptive directive of basic auth to send credentials to the server
        RequestSpecification httpRequest = RestAssured.given().auth().preemptive().basic("postman", "password");
        Response res = httpRequest.get("https://postman-echo.com/basic-auth");
        ResponseBody body = res.body();
        //Converting the response body to string
        String rbdy = body.asString();
        System.out.println("Data from the GET API- "+rbdy);
    }
}

The code example used above is a simple Get API where we are trying to fetch the details corresponding to the user. Note that the server needs the authentication details of the user to get a successful response. Let us glide through the code line-by-line.

 RequestSpecification httpRequest =  RestAssured.given().auth().preemptive().basic("postman", "password");

An object of RequestSpecification is created and using the preemptive directive the credentials of the user are sent in the header. Note that irrespective of being asked for the credentials these would be passed to the server.

Response res = httpRequest.get("https://postman-echo.com/basic-auth");
ResponseBody body = res.body();

The endpoint URL is accessed using the get method and the response is saved using the ResponseBody object.

String rbdy = body.asString(); 
System.out.println("Data from the GET API- "+rbdy);

Finally, we convert the response body to string and print the result. Similarly, you may add additional validations as per your requirements.

Console prints the response of the above code without errors.

basic_auth_rest_assured_success

And there you go! You have successfully retrieved the user data by simply adding the preemptive authentication in your code and passing the credentials.

Digest Authentication

It is somewhat similar to challenge-based authentication but is more secure as it uses a digestive key in subsequent requests. If at all it is intercepted by an eavesdropper, he will get access only to the transaction performed and not the user password. The transaction might be replayed but a new transaction cannot be made as the password is not exposed. Its syntax is similar to basic authentication-

given().auth().digest("your username", "your password").get("your end point URL")

Note that we cannot use the preemptive () similar to basic auth since this scheme uses only challenged authentication.

Form Authentication

There can be many cases when you need to pass the authentication credentials in an HTML form. This request is generally sent as a post method where the credentials entered in the form are used for authentication. So, if your application uses such a form-based authentication you can easily automate it using the form() scheme. The syntax for it follows-

given ().auth ().digest (“your username”“your password”).get (“your endpoint URL”)

given() .auth().form("your username", "your password").post("your end point URL")

If you use this approach then Rest Assured will first have to parse through the HTML response to find the fields for input and then send the form parameters. However, there is a high possibility that this approach might fail if the webpage is complex. Additionally, it would also fail if the context path is not included in the action attribute of the service. To optimize it to handle such cases, you may use the below format where you explicitly pass the required fields by providing the FormAuthConfig()-

given().auth().form("your username", "your password", new FormAuthConfig("/perform_signIn","user","password"))

OAuth Authentication

Another type of authentication is OAuth authentication. OAuth is an authorization framework that defines an identity protocol. It has wide usage in web applications and there are high chances that you will have to automate those authentication actions. These can be of two types viz, OAuth 1.0 and OAuth 2.0 which we will discuss now.

OAuth 1.0

Secured resources built using OAuth 1.0 requires passing consumer key, secret, access token, and token secret. The syntax it follows is –

given().auth().oauth(consumerKey, consumerSecret, accessToken, tokenSecret).get("your end point URL")

OAuth parameters read the required user input dynamically.

OAuth 2.0

There are cases when we need to generate an access token for a user session. This access token performs various transactions and helps maintain the user session. While using OAuth 2.0 you need to directly pass the access token generated when the user login using the below syntax-

given().auth().oauth2("Access token").get("your end point URL")

Using the access token you can easily request any of the resources secured using the OAuth scheme.

Now you may identify the types of authentication used in your web application. Similarly, you can use the corresponding authentication scheme to make full use of rest assured capabilities.

Automation Testing

TestNG Tutorial | What is Annotations & Framework in…

What is TestNG?

TestNG is an automation testing framework in which NG stands for “Next Generation”. TestNG is inspired by JUnit which uses the annotations (@). TestNG overcomes the disadvantages of JUnit and is designed to make end-to-end testing easy.

Using TestNG, you can generate a proper report, and you can easily come to know how many test cases are passed, failed, and skipped. You can execute the failed test cases separately.

For example:

  • Suppose, you have five test cases, one method is written for each test case (Assume that the program is written using the main method without using testNG). When you run this program first, three methods are executed successfully, and the fourth method is failed. Then correct the errors present in the fourth method, now you want to run only fourth method because first three methods are anyway executed successfully. This is not possible without using TestNG.
  • The TestNG in Selenium provides an option, i.e., testng-failed.xml file in test-output folder. If you want to run only failed test cases means you run this XML file. It will execute only failed test cases.

Beside above concept, you will learn more on TestNG, like what are the Advantages of TestNG, how to create test methods using @test annotations, how to convert these classes into testing suite file and execute through the eclipse as well as from the command line.

Why Use TestNG with Selenium?

Default Selenium tests do not generate a proper format for the test results. Using TestNG in Selenium, we can generate test results.

Most Selenium users use this more than Junit because of its advantages. There are so many features of TestNG, but we will only focus on the most important ones that we can use in Selenium. Following are the key features of Selenium TestNG:

  • Generate the report in a proper format including a number of test cases runs, the number of test cases passed, the number of test cases failed, and the number of test cases skipped.
  • Multiple test cases can be grouped more easily by converting them into testng.xml file. In which you can make priorities which test case should be executed first.
  • The same test case can be executed multiple times without loops just by using keyword called ‘invocation count.’
  • Using testng, you can execute multiple test cases on multiple browsers, i.e., cross browser testing.
  • The TestNG framework can be easily integrated with tools like TestNG Maven, Jenkins, etc.
  • Annotations used in the testing are very easy to understand ex: @BeforeMethod, @AfterMethod, @BeforeTest, @AfterTest
  • WebDriver has no native mechanism for generating reports. TestNG can generate the report in a readable format like the one shown below.
  • TestNG simplifies the way the tests are coded. There is no more need for a static main method in our tests. The sequence of actions is regulated by easy-to-understand annotations that do not require methods to be static.
  • Uncaught exceptions are automatically handled by TestNG without terminating the test prematurely. These exceptions are reported as failed steps in the report.

Advantages of TestNG over JUnit

There are three major advantages of TestNG over JUnit:

  • Annotations are easier to understand
  • Test cases can be grouped more easily
  • Parallel testing is possible

What is Annotation in TestNG?

Annotations in TestNG are lines of code that can control how the method below them will be executed. They are always preceded by the @ symbol. A very early and quick TestNG Example is the one shown below.

TestNG Tutorial

Annotations will be discussed later in the section named “Annotations used in TestNG,”so it is perfectly ok if you do not understand the above TestNG Example just yet. It is just important to note for now that annotations in TestNG are easier to code and understand than in JUnit.

The ability to run tests in parallel is available in TestNG but not in JUnit, so the TestNG framework is more preferred for testers using Selenium Grid.

How to Write Test Cases in TestNG?

Step 1) Write your business logic and insert the TestNG annotations in your code.
Step 2) Add more information like class name, groups name, package name, etc
Step 3) Run the TestNG.

Create Test Case Using TestNG Annotations

Now, we will learn how to create our first test case using TestNG Annotations in Selenium:

Before we create a test case, we should first setup a new TestNG Project in Eclipse and name it as “FirstTestNGProject”.

Setting up a new TestNG Project

Step 1: Click File > New > Java Project

TestNG Tutorial

Step 2: Type “FirstTestNGProject” as the Project Name then click Next.

TestNG Tutorial

Step 3: We will now start to import the TestNG Libraries onto our project. Click on the “Libraries” tab, and then “Add Library…”

TestNG Tutorial

Step 4: On the Add Library dialog, choose “TestNG” and click Next.

TestNG Tutorial

Step 5: Click Finish.

TestNG Tutorial

You should notice that TestNG is included on the Libraries list.

TestNG Tutorial

Step 6: We will now add the JAR files that contain the Selenium API. These files are found in the Java client driver that we downloaded from https://www.selenium.dev/downloads/ when we were installing Selenium and Eclipse in the previous chapters.

TestNG Tutorial

Then, navigate to where you have placed the Selenium JAR files.

TestNG Tutorial

After adding the external JARs, your screen should look like this.

TestNG Tutorial

Step 7: Click Finish and verify that our FirstTestNGProject is visible on Eclipse’s Package Explorer window.

TestNG Tutorial

How to Create a New TestNG Test File

Now that we are done setting up our project in this TestNG tutorial, let us create a new TestNG file.

Step 1: Click on ‘src’ and Choose other.
Right-click on the “src” package folder then choose New > Other…

TestNG Tutorial

Step 2: Select TestNG class.
Click on the TestNG folder and select the “TestNG class” option. Click Next.

TestNG Tutorial

Step 3: Type the values.
Type the values indicated below on the appropriate input boxes and click Finish. Notice that we have named our Java file as “FirstTestNGFile”.

TestNG Tutorial

Step 4: Template Created.
Eclipse should automatically create the template for our TestNG file shown below.

TestNG Tutorial

Coding of our First TestNG Test Case Example

Let us now create our first Test Case that will check if Mercury Tours’ homepage is correct. Type your code as shown in the below TestNG Example:

package firsttestngpackage;
import org.openqa.selenium.*;
import org.openqa.selenium.firefox.FirefoxDriver;
import org.testng.Assert;
import org.testng.annotations.*;

public class firsttestngfile {
    public String baseUrl = "http://demo.guru99.com/test/newtours/";
    String driverPath = "C:\\geckodriver.exe";
    public WebDriver driver ; 
     
  @Test
  public void verifyHomepageTitle() {
       
      System.out.println("launching firefox browser"); 
      System.setProperty("webdriver.gecko.driver", driverPath);
      driver = new FirefoxDriver();
      driver.get(baseUrl);
      String expectedTitle = "Welcome: Mercury Tours";
      String actualTitle = driver.getTitle();
      Assert.assertEquals(actualTitle, expectedTitle);
      driver.close();
  }
}

Notice the following.

  • TestNG does not require you to have a main() method.
  • Methods need not be static.
  • We used the @Test annotation. @Test is used to tell that the method under it is a test case. In this case, we have set the verifyHomepageTitle() method to be our test case, so we placed an ‘@Test’ annotation above it.
  • Since we use annotations in TestNG, we needed to import the package org.testng.annotations.*.
  • We used the Assert class. The Assert class is used to conduct verification operations in TestNG. To use it, we need to import the org.testng.Assert package.

You may have multiple test cases (therefore, multiple @Test annotations) in a single TestNG file. This will be tackled in more detail later in the section “Annotations used in TestNG.”

Running the Test

To run the test, simply run the file in Eclipse as you normally do. Eclipse will provide two outputs – one in the Console window and the other on the TestNG Results window.

TestNG Tutorial
TestNG Tutorial

Checking reports created by TestNG

The Console window in Eclipse gives a text-based report of our test case results while the TestNG Results window gives us a graphical one.

TestNG Tutorial

Generating HTML Reports

TestNG has the ability to generate reports in HTML format.

Step 1: After running our FirstTestNGFile that we created in the previous section, right-click the project name (FirstTestNGProject) in the Project Explorer window then click on the “Refresh” option.

TestNG Tutorial

Step 2: Notice that a “test-output” folder was created. Expand it and look for an index.html file. This HTML file is a report of the results of the most recent test run.

TestNG Tutorial

Step 3: Double-click on that index.html file to open it within Eclipse’s built-in web browser. You can refresh this page any time after you rerun your test by simply pressing F5 just like in ordinary web browsers.

TestNG Tutorial

Annotations used in TestNG

In the previous section, you have been introduced to the @Test annotation. Now, we shall be studying more advanced annotations and their usages.

Multiple Test Cases

We can use multiple @Test annotations in a single TestNG file. By default, methods annotated by @Test are executed alphabetically. See the code below. Though the methods c_test, a_test, and b_test are not arranged alphabetically in the code, they will be executed as such.

TestNG Tutorial

Run this code and on the generated index.html page, click “Chronological view.”

TestNG Tutorial

Parameters

If you want the methods to be executed in a different order, use the parameter “priority”. Parameters are keywords that modify the annotation’s function.

  • Parameters require you to assign a value to them. You do.this by placing a “=” next to them, and then followed by the value.
  • Parameters are enclosed in a pair of parentheses which are placed right after the annotation like the code snippet shown below.
TestNG Tutorial

TestNG will execute the @Test annotation with the lowest priority value up to the largest. There is no need for your priority values to be consecutive.

TestNG Tutorial

The TestNG HTML report will confirm that the methods were executed based on the ascending value of priority.

TestNG Tutorial

Multiple Parameters

Aside from “priority,” @Test has another parameter called “alwaysRun” which can only be set to either “true” or “false.” To use two or more parameters in a single annotation, separate them with a comma such as the one shown below.

@Test(priority = 0, alwaysRun = true)
TestNG Tutorial

@BeforeTest and @AfterTest

@BeforeTestmethods under this annotation will be executed prior to the first test case in the TestNG file.
@AfterTestmethods under this annotation will be executed after all test cases in the TestNG file are executed.

Consider the code below.

package firsttestngpackage;
import org.openqa.selenium.*;
import org.openqa.selenium.firefox.FirefoxDriver;
import org.testng.Assert;
import org.testng.annotations.*;
public class firsttestngfile {
    public String baseUrl = "http://demo.guru99.com/test/newtours/";
    String driverPath = "C:\\geckodriver.exe";
    public WebDriver driver ; 
     
     @BeforeTest
      public void launchBrowser() {
          System.out.println("launching firefox browser"); 
          System.setProperty("webdriver.gecko.driver", driverPath);
          driver = new FirefoxDriver();
          driver.get(baseUrl);
      }
      @Test
      public void verifyHomepageTitle() {
          String expectedTitle = "Welcome: Mercury Tours";
          String actualTitle = driver.getTitle();
          Assert.assertEquals(actualTitle, expectedTitle);
     }
      @AfterTest
      public void terminateBrowser(){
          driver.close();
      }
}

Applying the logic presented by the table and the code above, we can predict that the sequence by which methods will be executed is:

  • 1st – launchBrowser()
  • 2nd – verifyHomepageTitle()
  • 3rd – terminateBrowser()

The placement of the annotation blocks can be interchanged without affecting the chronological order by which they will be executed.

Summary of TestNG Annotations

@BeforeSuite: The annotated method will be run before all tests in this suite have run.

@AfterSuite: The annotated method will be run after all tests in this suite have run.

@BeforeTest: The annotated method will be run before any test method belonging to the classes inside the tag is run.

@AfterTest: The annotated method will be run after all the test methods belonging to the classes inside the tag have run.

@BeforeGroups: The list of groups that this configuration method will run before. This method is guaranteed to run shortly before the first test method that belongs to any of these groups is invoked.

@AfterGroups: The list of groups that this configuration method will run after. This method is guaranteed to run shortly after the last test method that belongs to any of these groups is invoked.

@BeforeClass: The annotated method will be run before the first test method in the current class is invoked.

@AfterClass: The annotated method will be run after all the test methods in the current class have been run.

@BeforeMethod: The annotated method will be run before each test method.

@AfterMethod: The annotated method will be run after each test method.

@Test: The annotated method is a part of a test case

Automation Testing

Page Object Model with Page Factory in Selenium (Facebook…

What is Page Object Model Design Patten (POM):

Page Object Model is a Design Pattern which has become popular in Selenium Test Automation. It is widely used design pattern in Selenium for enhancing test maintenance and reducing code duplication. Page object model (POM) can be used in any kind of framework such as modular, data-driven, keyword driven, hybrid framework etc.  A page object is an object-oriented class that serves as an interface to a page of your Application Under Test(AUT). The tests then use the methods of this page object class whenever they need to interact with the User Interface (UI) of that page. The benefit is that if the UI changes for the page, the tests themselves don’t need to change, only the code within the page object needs to change. Subsequently, all changes to support that new UI is located in one place.

What is Page Factory:

We have seen that ‘Page Object Model’ is a way of representing an application in a test framework. For every ‘page’ in the application, we create a Page Object to reference the ‘page’ whereas a ‘Page Factory’ is one way of implementing the ‘Page Object Model’.

What is the difference between Page Object Model (POM) and Page Factory:

Page Object is a class that represents a web page and hold the functionality and members.
Page Factory is a way to initialize the web elements you want to interact with within the page object when you create an instance of it.

Advantages of Page Object Model Framework:

  • Code reusability – We could achieve code reusability by writing the code once and use it in different tests.
  • Code maintainability – There is a clean separation between test code and page specific code such as locators and layout which becomes very easy to maintain code. Code changes only on Page Object Classes when a UI change occurs. It enhances test maintenance and reduces code duplication.
  • Object Repository – Each page will be defined as a java class. All the fields in the page will be defined in an interface as members. The class will then implement the interface.
  • Readability – Improves readability due to clean separation between test code and page specific code

Creating a Page Object Model with Page Factory in Selenium WebDriver:

Project Structure:

Step 1: Creating TestBase class. Here we create an object of WebDriver, maximize browser, implementing waits, launching URL and etc.,

In the below example program, I have taken chrome browser and set the System Property to launch chrome browser.

TestBase.java (BASE CLASS)

package tests;

import java.io.IOException;
import java.util.concurrent.TimeUnit;

import org.openqa.selenium.WebDriver;
import org.openqa.selenium.chrome.ChromeDriver;
import org.openqa.selenium.chrome.ChromeOptions;
import org.testng.annotations.AfterSuite;
import org.testng.annotations.BeforeSuite;
import org.testng.annotations.Test;

public class TestBase {
	public static WebDriver driver = null;
	@BeforeSuite
	public void initialize() throws IOException{
	System.setProperty("webdriver.chrome.driver", System.getProperty("user.dir")+"\\src\\test\\java\\drivers\\chromedriver.exe");
	
	ChromeOptions coptions = new ChromeOptions();
	coptions.addArguments("--disable-notifications");
	
	driver = new ChromeDriver(coptions);
	//To maximize browser
	                driver.manage().window().maximize();
	        //Implicit wait
	         driver.manage().timeouts().implicitlyWait(20, TimeUnit.SECONDS);
	//To open facebook
	                driver.get("https://www.facebook.com/login");
	}
	@AfterSuite
	//Test cleanup
	public void TeardownTest()
	    {
	        TestBase.driver.quit();
	    }
}

Step 2: Creating classes for each page (Eg., Facebook Login Page,  Facebook Inbox Page) to hold element locators and their methods. Usually, we create page objects for all available pages in the AUT. For each page, we create a separate class with a constructor. Identify all the locators and keep them in one class. It allows us to reuse the locators in multiple methods. It allows us to do easy maintenance, if there is any change in the UI, we can simply change on one Page.

Here, I create java files (FacebookLoginPage.java and FacebookInboxPage.java) for the corresponding pages (Facebook Login Page, and Facebook Inbox Page) to hold element locators and their methods.

FBHomePage.java (Webpage 1)

package pages;

import org.openqa.selenium.By;
import org.openqa.selenium.WebDriver;
import org.openqa.selenium.WebElement;
import org.openqa.selenium.support.FindBy;
import org.openqa.selenium.support.How;

public class FBHomePage {
	WebDriver driver;
	 
    public FBHomePage(WebDriver driver){
            this.driver=driver;
    }
    //Using FindBy for locating elements
    
    
@FindBy(how=How.CLASS_NAME, using="x3ajldb") WebElement profileDropdown;
@FindBy(how=How.XPATH, using="//span[contains(.,'Log Out')]") WebElement logoutLink;
@FindBy(how=How.XPATH, using="//a[@aria-label='Rahul Kundu'][contains(.,'Rahul Kundu')]") WebElement loggedInUserNameText;
    
//Defining all the user actions (Methods) that can be performed in the Facebook home page

    // This method to click on Profile Dropdown
public void clickOnProfileDropdown(){

//WebElement profileDropdown = driver.findElement(By.className("x3ajldb"));
profileDropdown.click();
}
//This method to click on Logout link
public void clickOnLogoutLink(){
	
logoutLink.click();
}
//This method to verify LoggedIn Username Text
public String verifyLoggedInUserNameText(){
String userName = loggedInUserNameText.getText();
return userName;
}

}

FBLoginPage.java (Webpage 2)

package pages;

import org.openqa.selenium.WebDriver;
import org.openqa.selenium.WebElement;
import org.openqa.selenium.support.FindBy;
import org.openqa.selenium.support.How;

public class FBLoginPage {
	WebDriver driver;
	 
    public FBLoginPage(WebDriver driver){
             this.driver=driver;
    }

//Using FindBy for locating elements
@FindBy(how=How.XPATH, using="//input[contains(@name,'email')]") WebElement emailTextBox;
@FindBy(how=How.XPATH, using="//input[@type='password']") WebElement passwordTextBox;
@FindBy(how=How.XPATH, using="//button[@name='login']") WebElement signinButton;
    // Defining all the user actions (Methods) that can be performed in the Facebook home page

    // This method is to set Email in the email text box
public void setEmail(String strEmail){
emailTextBox.sendKeys(strEmail);
}
//This method is to set Password in the password text box
public void setPassword(String strPassword){
passwordTextBox.sendKeys(strPassword);
}
//This method is to click on Login Button
public void clickOnLoginButton(){
signinButton.click();
}

}

Step 3: Creating Test (Eg., FBLoginTest) based on above pages. As per my test scenario which was mentioned above, scripts run as follows.

  1. Launch browser and open facebook.com
  2. Enter user credentials and do signin
  3. Verify the loggedIn user name and do logout

FBLoginTest.java (Test Case 1)

package tests;

import org.openqa.selenium.support.PageFactory;
import org.testng.annotations.Test;

import pages.FBHomePage;
import pages.FBLoginPage;

public class FbLoginTest extends TestBase{
	
	@Test
	public void init() throws Exception{

			//driver.get("https://www.facebook.com");
			FBLoginPage loginpage = PageFactory.initElements(driver, FBLoginPage.class);
			loginpage.setEmail("rahul.******@gmail.com");
			loginpage.setPassword("*********");
			loginpage.clickOnLoginButton();
			
			FBHomePage homepage = PageFactory.initElements(driver, FBHomePage.class);
			homepage.clickOnProfileDropdown();
			homepage.verifyLoggedInUserNameText();
			homepage.clickOnLogoutLink();	
		}
	
}

Step 4: Creating testng.xml file

<?xml version="1.0" encoding="UTF-8"?>
<!DOCTYPE suite SYSTEM "http://testng.org/testng-1.0.dtd">
<suite name="POM Suite">
 
<test name="Page Object Model Project">
<classes>
<class name="tests.TestBase" />
<class name="tests.FbLoginTest" />
</classes>
</test>
</suite> <!-- Suite -->

Please check the pom.xml that i have used.

<project xmlns="http://maven.apache.org/POM/4.0.0" xmlns:xsi="http://www.w3.org/2001/XMLSchema-instance" xsi:schemaLocation="http://maven.apache.org/POM/4.0.0 https://maven.apache.org/xsd/maven-4.0.0.xsd">
  <modelVersion>4.0.0</modelVersion>
  <groupId>PageObjectModel</groupId>
  <artifactId>pomtest</artifactId>
  <version>0.0.1-SNAPSHOT</version>
  
  <dependencies>
    <dependency>
      <groupId>junit</groupId>
      <artifactId>junit</artifactId>
      <version>4.11</version>
      <scope>test</scope>
    </dependency>
    
    <dependency>
    <groupId>org.seleniumhq.selenium</groupId>
    <artifactId>selenium-java</artifactId>
    <version>4.6.0</version>
</dependency>
<dependency>
  <groupId>org.testng</groupId>
  <artifactId>testng</artifactId>
  <version>7.6.0</version>
  <scope>test</scope>
</dependency>

  </dependencies>
</project>

This is 100% working code and if you find any difficulty then you can post your queries.

RK